How to Add a Salesforce Web to Lead Form WordPress: A Complete Guide
Introduction to salesforce web to lead form wordpress
Web-to-Lead is a powerful feature in Salesforce that allows you to capture lead information directly from your website. By implementing Web-to-Lead forms on your WordPress site, you can streamline your lead generation process and automatically create new leads in your Salesforce CRM.
Key benefits of using Salesforce Web-to-Lead include:
- Immediate lead capture and creation in Salesforce
- Customizable forms to collect relevant information
- Seamless integration with your existing Salesforce workflows
- Improved lead response times
- Better tracking of your online lead sources
In this guide, we’ll walk you through the process of creating a Web-to-Lead form in Salesforce and embedding it into your WordPress website.
Explore how Web-to-Lead works, how to set it up in Salesforce, and tips for using it effectively.
Creating a Web-to-Lead Form in Salesforce
To create a Web-to-Lead form in Salesforce, follow these steps:
Accessing Web-to-Lead in Salesforce
1. Log in to your Salesforce account
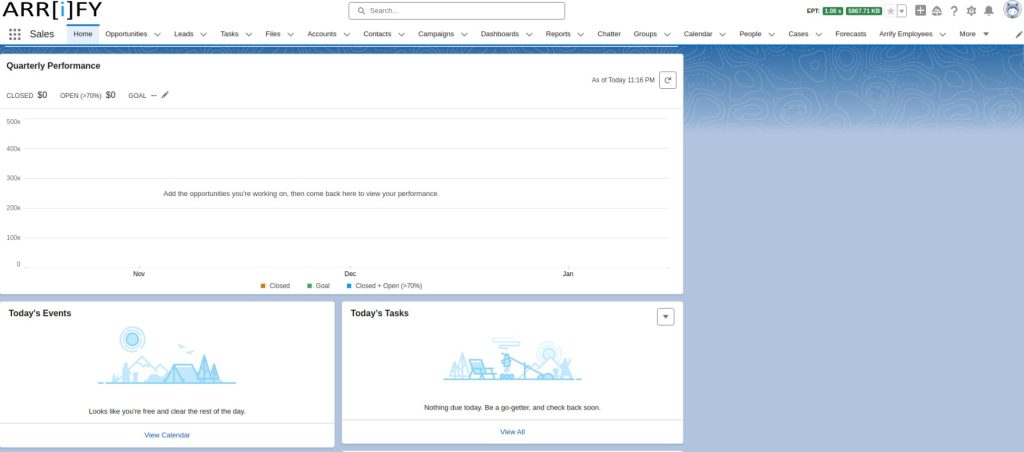
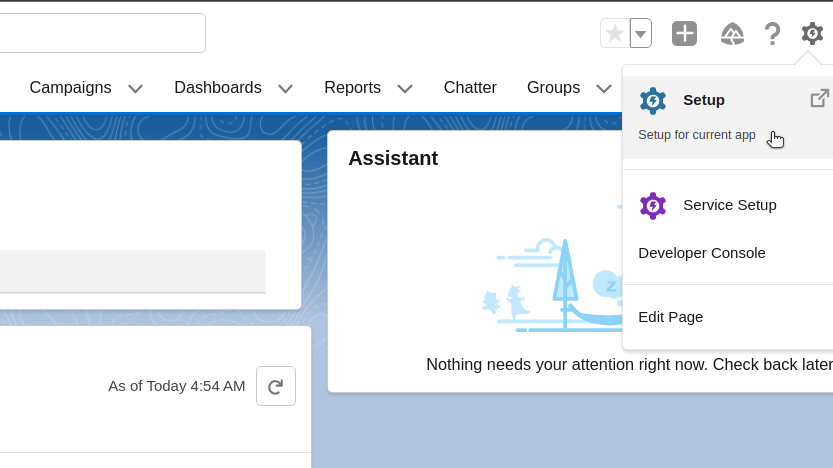
2. Click on ‘Setup’ in the top right corner
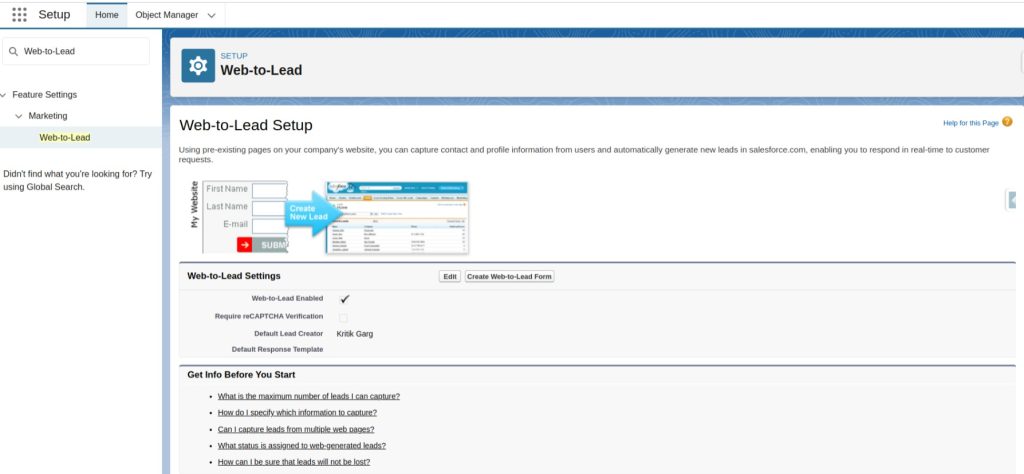
3. In the Quick Find box, type “Web-to-Lead” then Click on “Web-to-Lead” under “Leads” in the search results
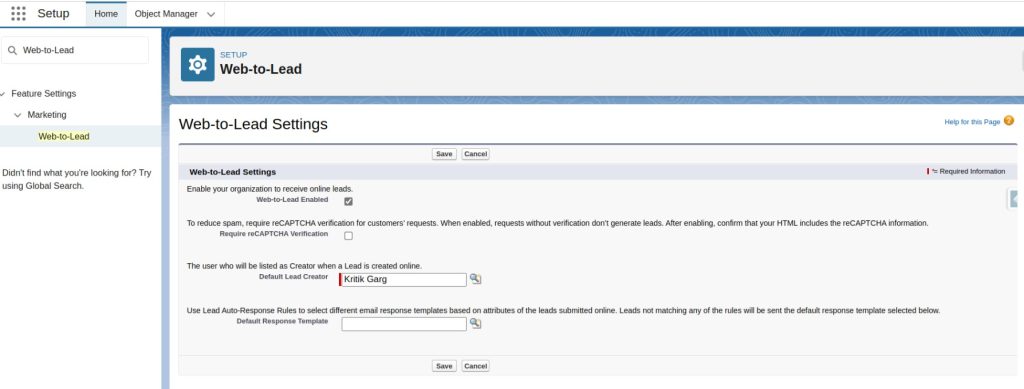
4. Click the “Edit” button, then enable the “Web-To-Lead” setting. You can also choose to enable reCAPTCHA verification if desired.
Selecting fields for your form
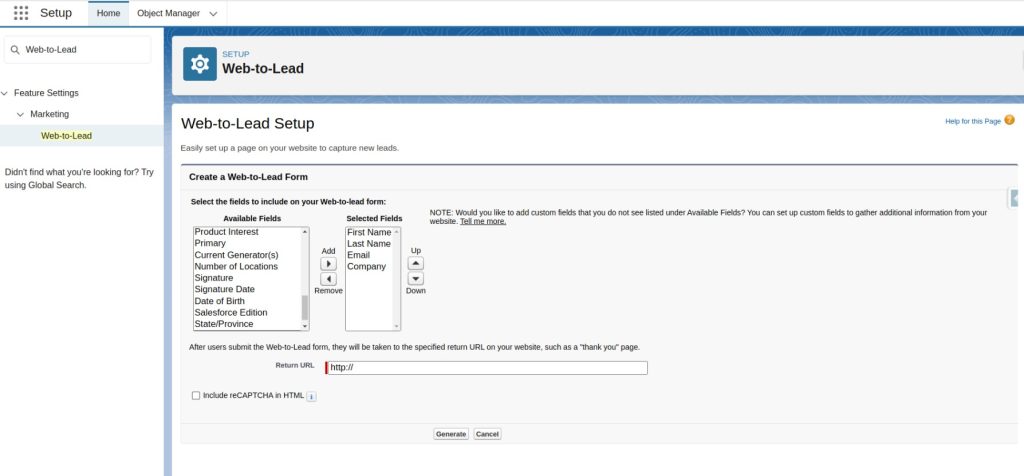
1. On the Web-to-Lead page, click “Create Web-to-Lead Form”

2. Select the fields you want to include in your form from the “Available Fields” list. Click the “Add” button to move them to the “Selected Fields” list. Arrange the fields in your desired order using the “Up” and “Down” buttons. Make sure to include any required fields (usually marked with a red asterisk).
Generating the HTML code
1. Scroll down to the “Generate Form” section, Enter the URL of the page where leads will be directed after form submission in the “Return URL” field. Optionally, check the box to enable reCAPTCHA for spam protection.
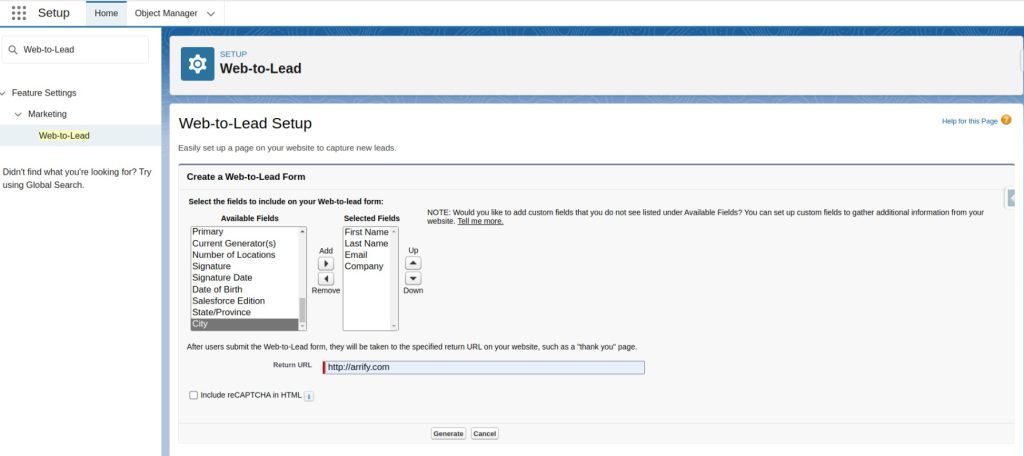
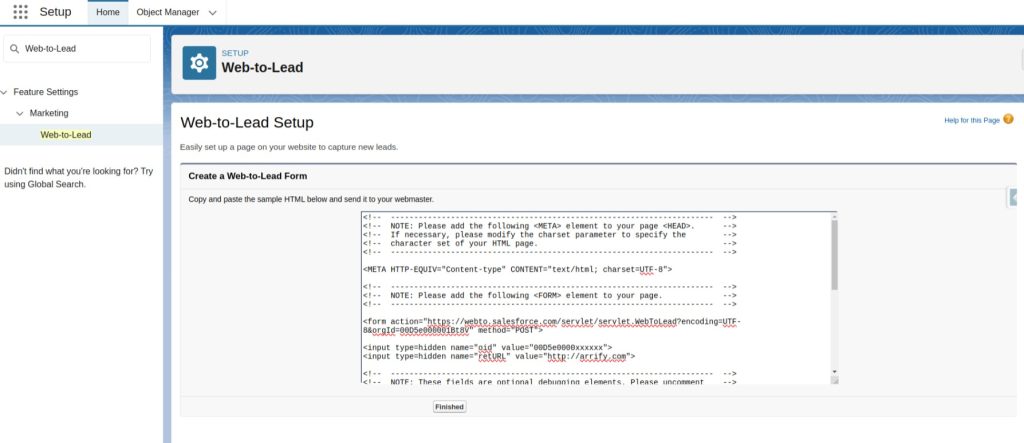
2. Click “Generate” to create your form’s HTML code. Copy the generated HTML code . You’ll need this to embed the form in WordPress.
Additional tips
- Consider adding hidden fields to track the source of your leads
- You can customize the “Return URL” to create different thank you pages for different forms
- Remember that standard Web-to-Lead forms have a limit of 500 leads per day. If you need more, consider using the API or a third-party integration
Now that you have your Web-to-Lead form HTML, you’re ready to embed it into your WordPress site. In the next section, we’ll cover how to do this using both direct HTML insertion and shortcodes.
Embedding the Form in WordPress
Once you have your Salesforce Web-to-Lead form HTML, you can embed it in your WordPress site using two main methods:
Explore the benefits and complete guide to integrating Salesforce with WordPress.
Direct HTML insertion
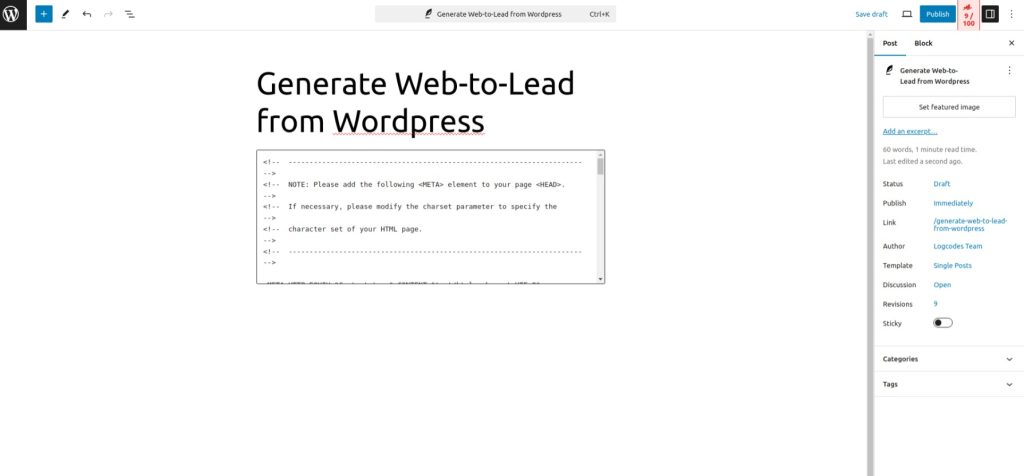
- Switch to the “Text” or “Code” editor (not the visual editor).
- Paste the HTML code from Salesforce directly into the editor where you want the form to appear.
- Open the WordPress page or post where you want to add the form.
- Update or publish your page.
5. Fill out the Web-to-Lead form and click “Submit” to generate a lead.
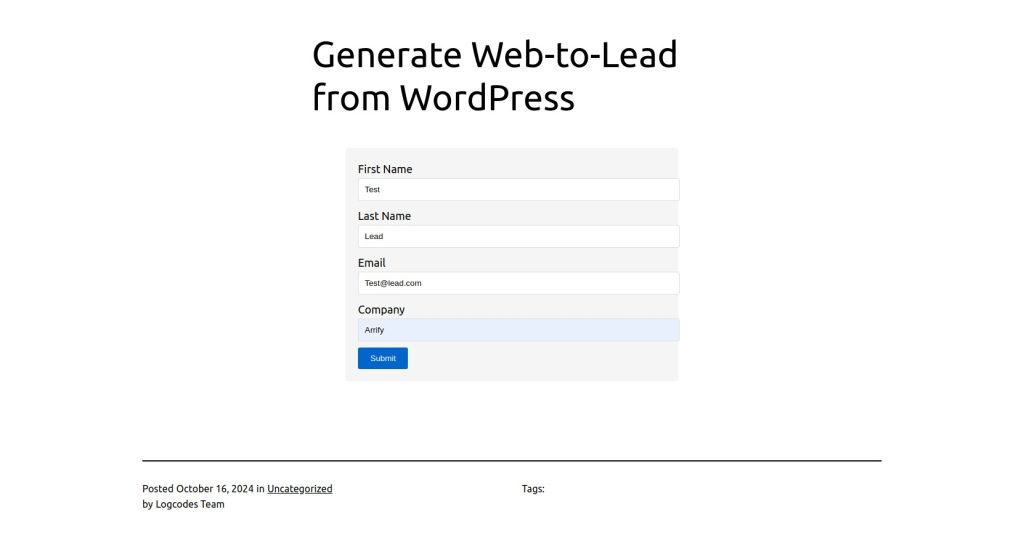
6. Navigate to your Salesforce org and click on the Lead tab to verify the creation of the lead record.

Explanation of the code snippets
- This is the raw HTML form that you’d paste directly into your WordPress page or post using the Text/HTML editor.
- Replace
YOUR_SALESFORCE_ORG_IDwith your actual Salesforce Organization ID. - Update the
Return_URLvalue to point to your thank you page.
<META HTTP-EQUIV="Content-type" CONTENT="text/html; charset=UTF-8">
<style>
/* Style form container */
.salesforce-form {
    max-width: 500px;
    margin: 0 auto;
    padding: 20px;
    background-color: #f5f5f5;
    border-radius: 5px;
}
/* Style form inputs */
.salesforce-form input[type="text"],
.salesforce-form input[type="email"],
.salesforce-form textarea {
    width: 100%;
    padding: 10px;
    margin-bottom: 10px;
    border: 1px solid #ddd;
    border-radius: 3px;
}
/* Style submit button */
.salesforce-form input[type="submit"] {
    background-color: #0066cc;
    color: white;
    padding: 10px 20px;
    border: none;
    border-radius: 3px;
    cursor: pointer;
}
</style>
<form action="https://webto.salesforce.com/servlet/servlet.WebToLead?encoding=UTF-8&orgId=YOUR_SALESFORCE_ORG_ID" method="POST" class="salesforce-form">
    <input type="hidden" name="oid" value="YOUR_SALESFORCE_ORG_ID">
    <input type="hidden" name="retURL" value="Return_URL">
    <label for="first_name">First Name</label>
    <input id="first_name" maxlength="40" name="first_name" size="20" type="text" /><br>
    <label for="last_name">Last Name</label>
    <input id="last_name" maxlength="80" name="last_name" size="20" type="text" /><br>
    <label for="email">Email</label>
    <input id="email" maxlength="80" name="email" size="20" type="text" /><br>
    <label for="company">Company</label>
    <input id="company" maxlength="40" name="company" size="20" type="text" /><br>
    <input type="submit" name="submit" value="Submit">
</form>Note: Some WordPress themes or page builders may strip out HTML. If this happens, you may need to use a plugin that allows custom HTML or use the shortcode method.
Using a shortcode
1. Go to your WordPress admin dashboard.
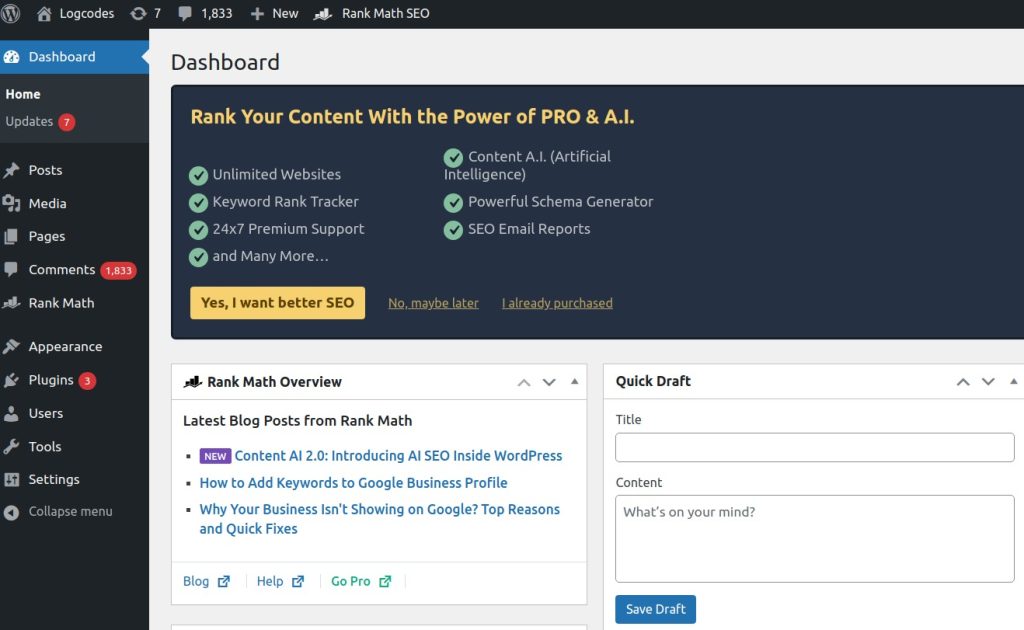
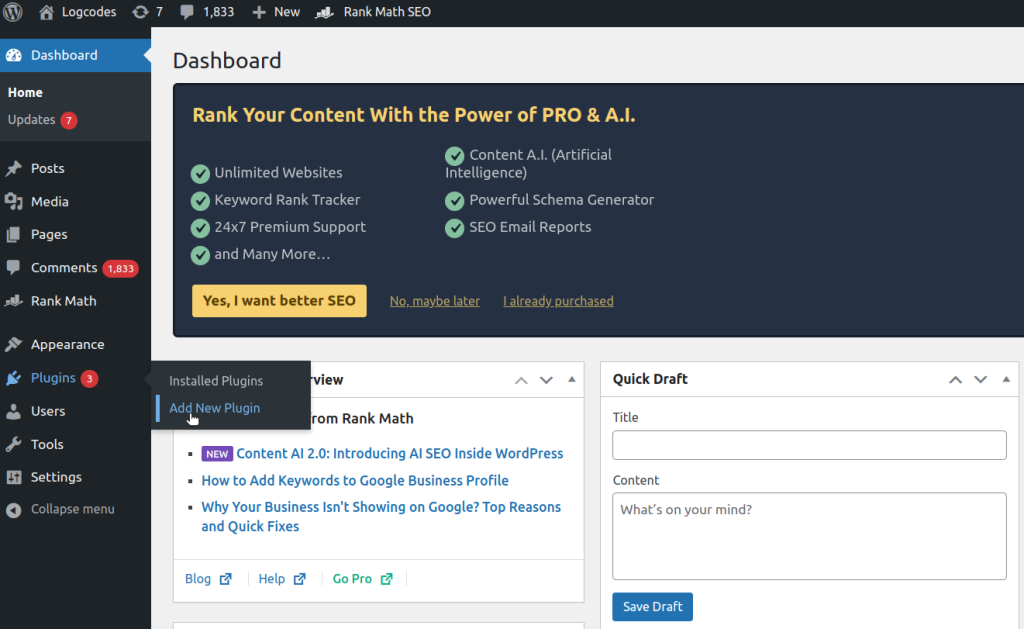
2. Navigate to Plugins > Add New.
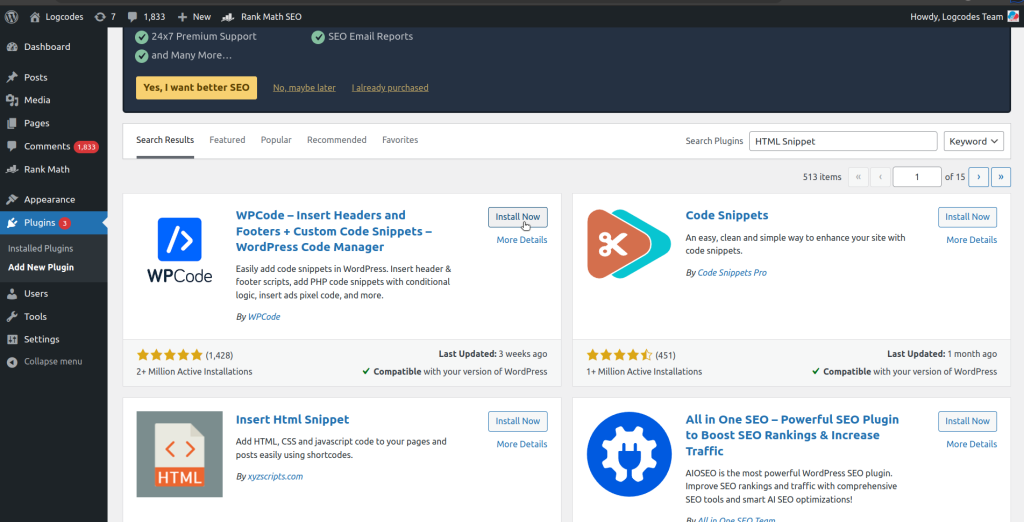
3. Search for a plugin like “Insert HTML Snippet” or “Shortcoder.” Click Install Now, then Activate the plugin.
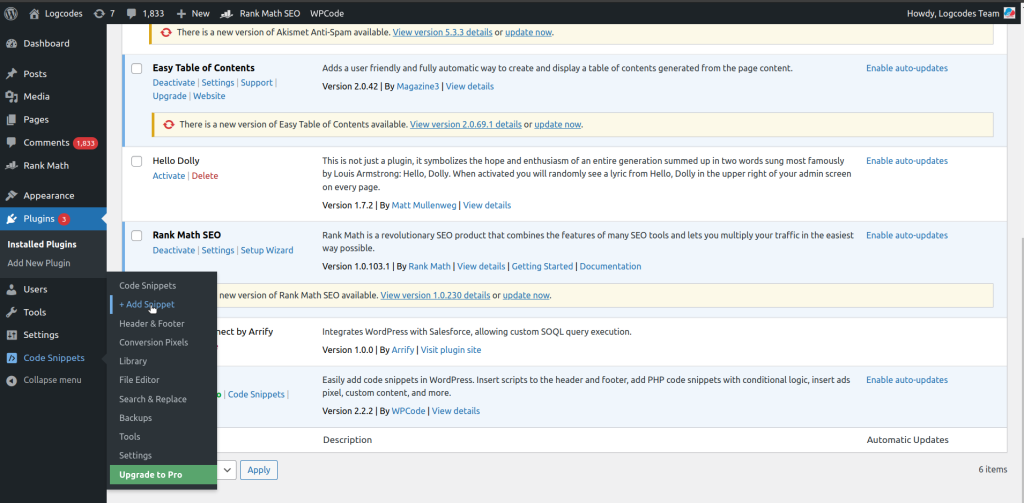
4. After activating the plugin, go to Code Snippets, click on “+ Add Snippet“.
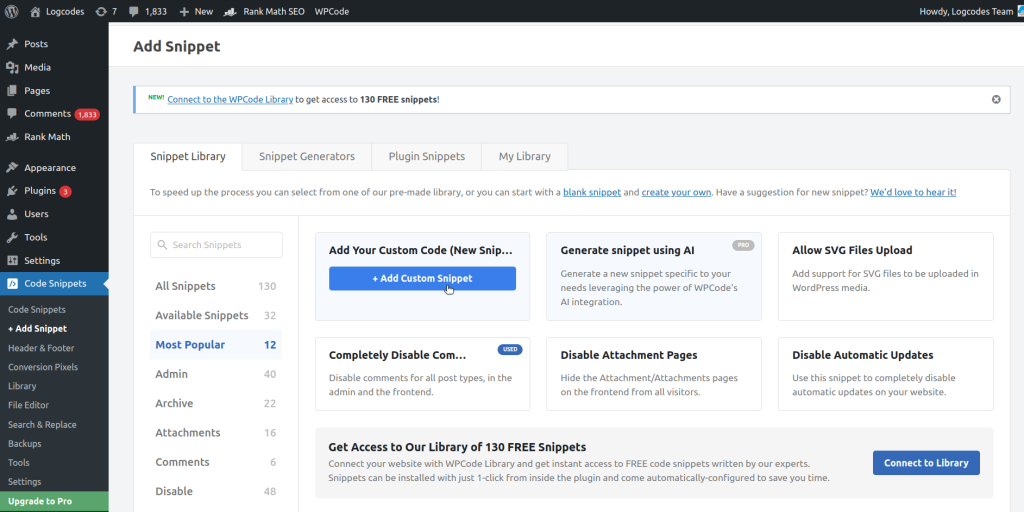
5. Click on “Add Custom Snippet”
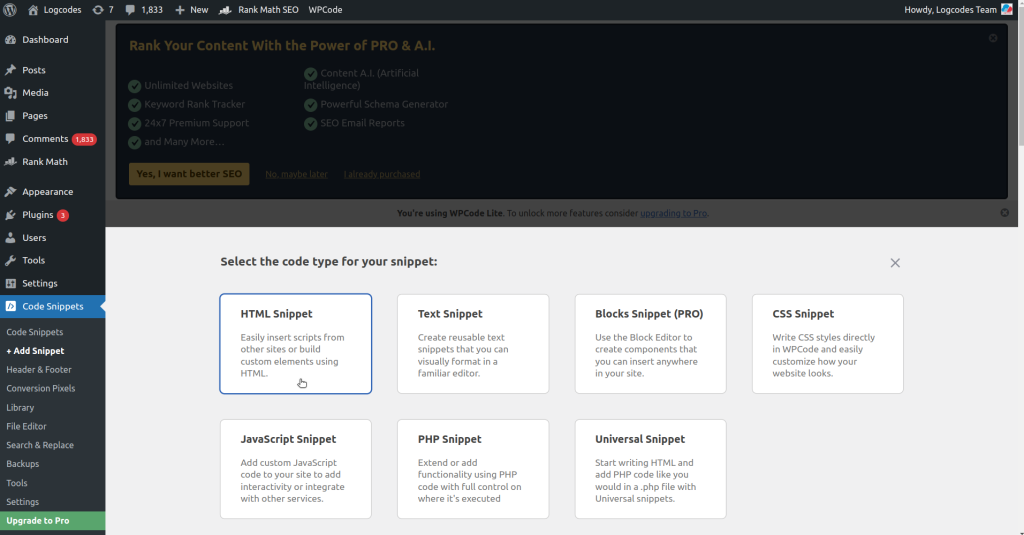
6. Select the code type for your snippet, Click on “HTML Snippet”
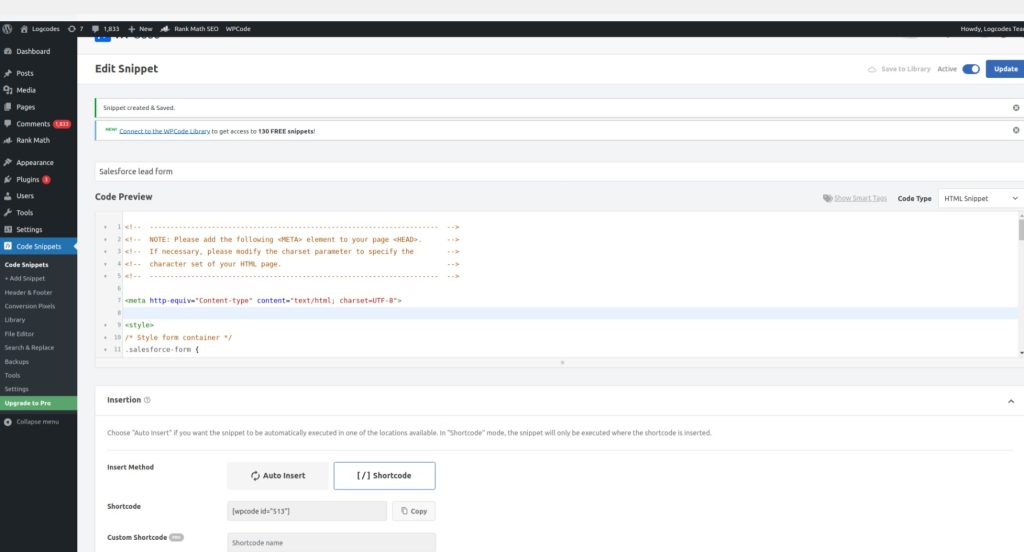
7. Name your snippet and paste your Salesforce form HTML code. Activate it and save. Copy the shortcode, then insert it into your WordPress page or post where you want the form to appear.
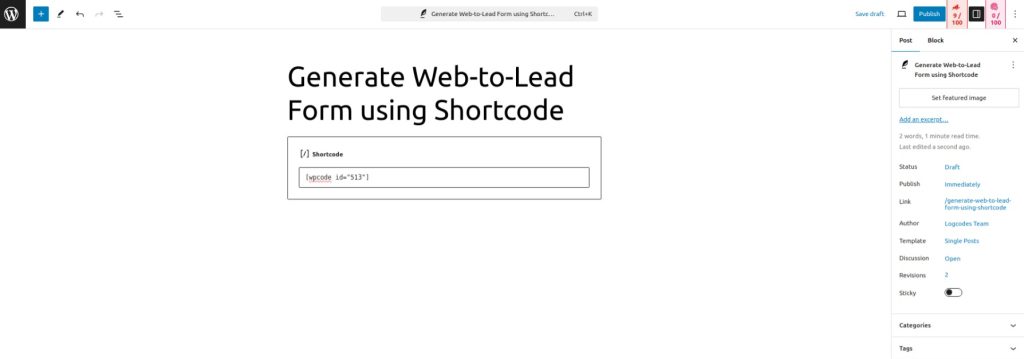
8. Open the WordPress page or post where you want to add the form. Search for or select the “Shortcode” block. In the block, enter your shortcode. Finally, save or publish your page.
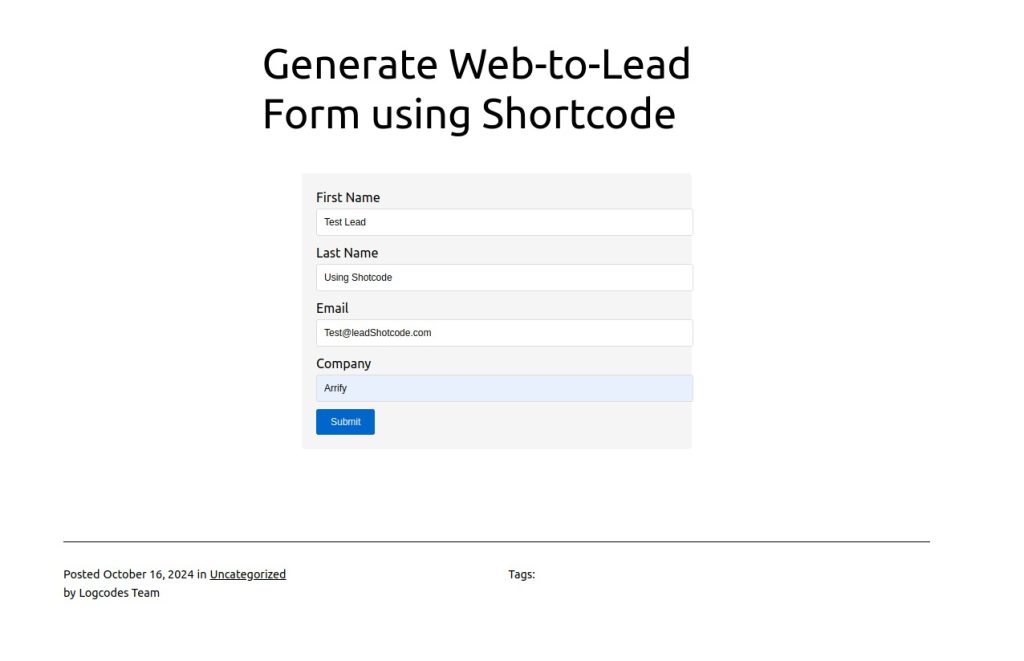
9. Fill out the Web-to-Lead form and click “Submit” to generate a lead.
10. Navigate to your Salesforce org and click on the Lead tab to verify the creation of the lead record.

Using a shortcode can be more convenient if you plan to use the same form on multiple pages or want to easily update the form across your site.
Explanation of the code snippets
- The HTML code snippet “salesforce_lead_form” generates the HTML for the form. It also provide a insert method called “shortcode”.
- The shortcode
[wpcode_id="513"]]is used to display a Salesforce lead form in your WordPress content. - When this shortcode is added to a page or post, it triggers a function that generates the HTML for the form.
- The function captures the HTML output using techniques that allow for easy manipulation and rendering.
- Replace
YOUR_SALESFORCE_ORG_IDwith your actual Salesforce Organization ID. - Update the
Return_URLvalue to point to your thank you page.
<meta http-equiv="Content-type" content="text/html; charset=UTF-8">
<style>
/* Style form container */
.salesforce-form {
    max-width: 500px;
    margin: 0 auto;
    padding: 20px;
    background-color: #f5f5f5;
    border-radius: 5px;
}
/* Style form inputs */
.salesforce-form input[type="text"],
.salesforce-form input[type="email"],
.salesforce-form textarea {
    width: 100%;
    padding: 10px;
    margin-bottom: 10px;
    border: 1px solid #ddd;
    border-radius: 3px;
}
/* Style submit button */
.salesforce-form input[type="submit"] {
    background-color: #0066cc;
    color: white;
    padding: 10px 20px;
    border: none;
    border-radius: 3px;
    cursor: pointer;
}
</style>
<form action="https://webto.salesforce.com/servlet/servlet.WebToLead?encoding=UTF-8&orgId=YOUR_SALESFORCE_ORG_ID" method="POST" class="salesforce-form">
    <input type="hidden" name="oid" value="YOUR_SALESFORCE_ORG_ID">
    <input type="hidden" name="retURL" value="Return_URL">
<label for="first_name">First Name</label>
    <input id="first_name" maxlength="40" name="first_name" size="20" type="text" />
<br>
    <label for="last_name">Last Name</label>
    <input id="last_name" maxlength="80" name="last_name" size="20" type="text" />
<br>
    <label for="email">Email</label>
    <input id="email" maxlength="80" name="email" size="20" type="text" /><br>
    <label for="company">Company</label>
    <input id="company" maxlength="40" name="company" size="20" type="text" /><br>
    <input type="submit" name="submit" value="Submit">
</form>
Styling Your Web-to-Lead Form
By default, your Salesforce form may not match your WordPress theme. Here’s how you can style it:
Basic CSS techniques
- Inspect your form elements using browser developer tools to identify class names
- Add custom CSS to your WordPress theme or a custom CSS plugin. For example:
/* Style form container */
.salesforce-form {
    max-width: 500px;
    margin: 0 auto;
    padding: 20px;
    background-color: #f5f5f5;
    border-radius: 5px;
}
/* Style form inputs */
.salesforce-form input[type="text"],
.salesforce-form input[type="email"],
.salesforce-form textarea {
    width: 100%;
    padding: 10px;
    margin-bottom: 10px;
    border: 1px solid #ddd;
    border-radius: 3px;
}
/* Style submit button */
.salesforce-form input[type="submit"] {
    background-color: #0066cc;
    color: white;
    padding: 10px 20px;
    border: none;
    border-radius: 3px;
    cursor: pointer;
}
Matching your WordPress theme
- Use your theme’s color scheme in your form styles
- Match font styles to your theme’s typography
- Adjust padding and margins to align with your theme’s spacing
Additional styling tips
- Use responsive design techniques to ensure your form looks good on all devices
- Consider adding hover and focus states to improve user interaction
- If using a page builder, you may be able to style the form using the builder’s built-in styling options
Remember to test your form thoroughly after styling to ensure all fields are still functional and the form submits correctly to Salesforce.
Conclusion
Implementing Salesforce Web-to-Lead forms in WordPress is a powerful way to streamline your lead generation process. By following the steps outlined in this guide, you can:
- Create a customized Web-to-Lead form in Salesforce
- Embed the form in your WordPress site using either direct HTML insertion or shortcodes
- Style the form to match your WordPress theme and improve user experience
This integration allows you to capture leads directly from your website and automatically create new lead records in Salesforce, improving your response times and overall lead management efficiency.
FAQs
Is there a limit to how many leads I can capture with Web-to-Lead?
Yes, the standard limit is 500 leads per day. If you need more, consider using Salesforce API or a third-party integration.
How can I prevent spam submissions?
Enable reCAPTCHA in your Salesforce Web-to-Lead settings. You can also use WordPress plugins for additional spam protection.
Can I send leads to different Salesforce campaigns based on the form?
Yes, you can use hidden fields in your form to assign leads to specific campaigns or record types.
How do I troubleshoot if leads aren’t appearing in Salesforce?
Check that your Organization ID is correct, ensure all required fields are included, and verify that your daily lead limit hasn’t been exceeded. Also, check your Salesforce lead assignment rules.
How can I track which page or source the lead came from?
You can add hidden fields to your form to capture this information, such as UTM parameters or specific page identifiers.
Helpful Resources
Explore 3 powerful Salesforce web forms to enhance and customize data collection within WordPress.
Learn how to connect gravity form with Salesforce.
Get started with the WP Gravity Forms Salesforce plugin.
