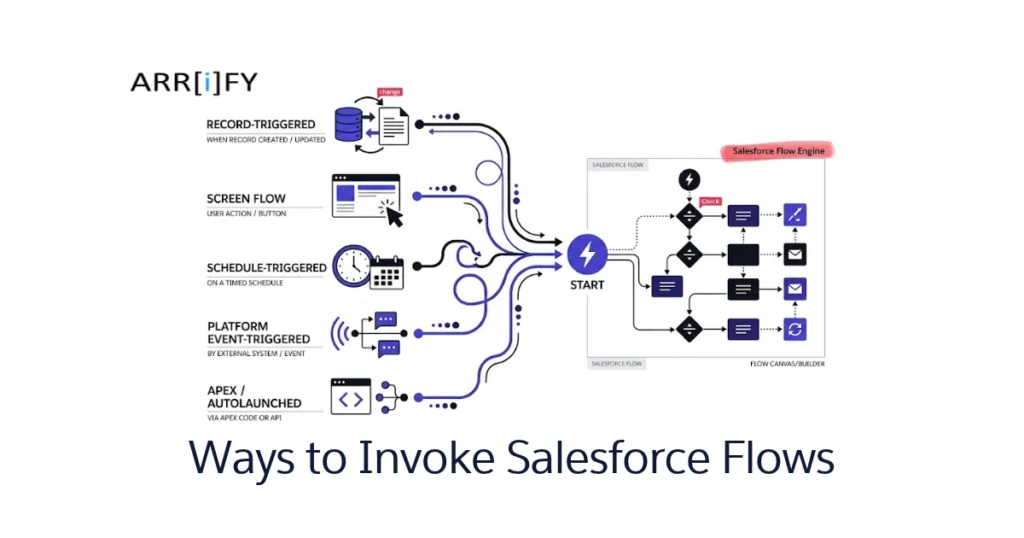
Salesforce Flows are great automation tools, but they’re only useful if you know how to actually get them running.
Whether you’re building a simple data collection form or automating a complex business process, mastering the different ways to invoke Salesforce Flows ensures your automations run smoothly and at the right time.
In this guide, we’ll go through every method available to start a Salesforce Flow, explain when each one makes sense, and help you pick the right approach for your use case.
Understanding the Flow in Salesforce?
A Flow in Salesforce is a no-code automation tool that lets you collect data, apply logic, and perform actions — like updating records, sending emails, or creating tasks — all without writing code.
Built using Flow Builder, it’s a drag-and-drop tool that gives Salesforce Admins and developers the power to automate complex processes visually.
Think of it as a digital assistant that handles tasks for you once you tell it when and how to start.
To learn more about Salesforce Flow, check out “The Ultimate Guide on Salesforce Flow” – it covers everything you need to know.
Why Invoking a Flow Matters
Even the best-built Flow won’t do anything until it’s triggered. How you invoke a Flow decides when it runs, how it runs, and who can run it — and that directly affects both system performance and user experience.
Choosing the right trigger makes sure your automation runs smoothly, without errors, and exactly when it should.
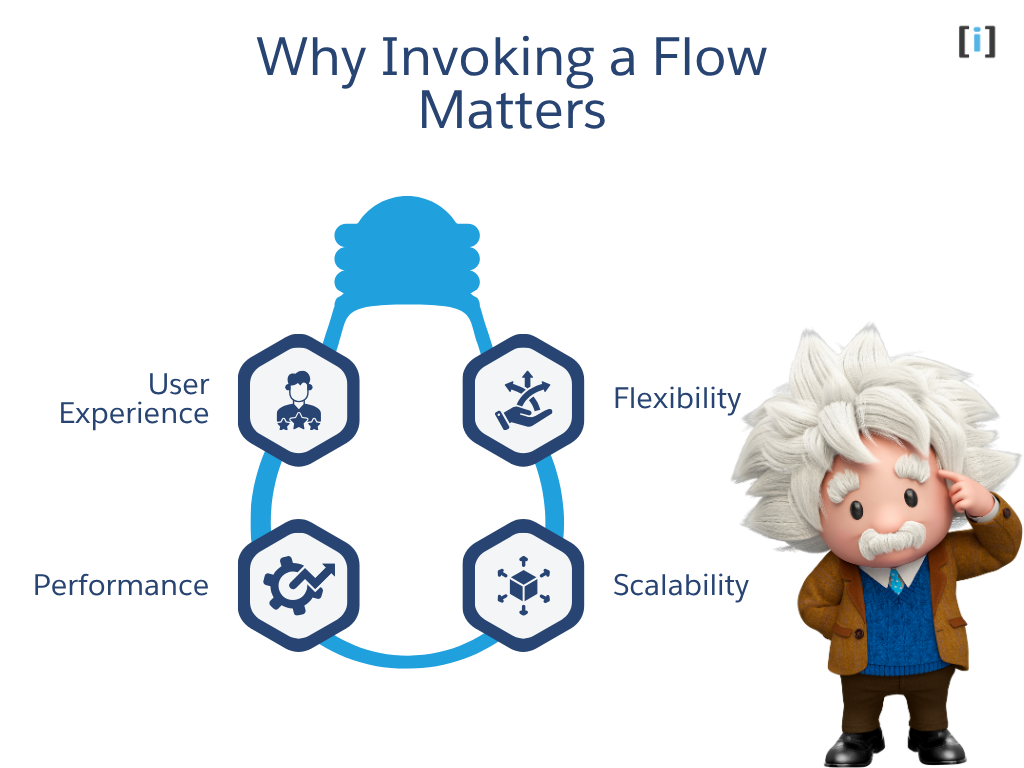
Here’s why getting this right matters:
User Experience
If a Flow starts at the wrong moment or in the wrong place, it can confuse users or disrupt their work. A well-timed Flow feels seamless and supports users instead of distracting them.
Performance
Not all invocation methods are equal. Some triggers run faster and use fewer system resources, which helps your org stay performant — especially when you’re dealing with large volumes of data.
Scalability
Some Flow types and triggers handle bulk records better than others. Picking the right trigger means your automation won’t slow down as your data and processes grow.
Flexibility
Every business scenario is different. Some processes need user interaction, while others should run quietly in the background. Knowing your trigger options helps you build Flows that can adapt as requirements change.
Overview of Flow Types
Before we get into the different ways you can trigger a Flow, let’s quickly go over the main categories of Flows in Salesforce.
Knowing these categories will help you figure out which type of Flow fits your situation best.
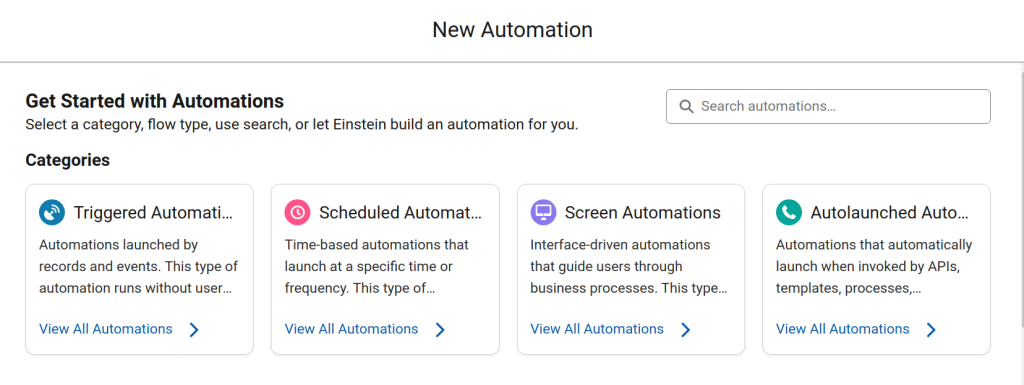
Each category has a different purpose and is built for a different kind of automation:
Screen Flows
These guide users through a process step by step. They show screens where users enter data or make selections, so they always need user interaction.
Autolaunched Flows
These run on their own when something triggers them — like an API call, Apex code, another Flow, or a system event. No user interaction needed, which makes them great for behind-the-scenes work and integrations.
Triggered Flows
These kick off when a specific record changes or a platform event fires. They also run without user input and are commonly used for actions tied to data changes.
Scheduled Flows
These run at a set time or on a recurring schedule (daily, weekly, monthly, etc.). Like other background Flows, they don’t need user interaction and work well for routine maintenance or batch updates.
17 Ways to Invoke Salesforce Flows (User-Invoked vs. System-Invoked)
Salesforce Flows can be started (or “invoked”) in many different ways, and the method you pick determines how the Flow behaves, who can use it, and when it runs.
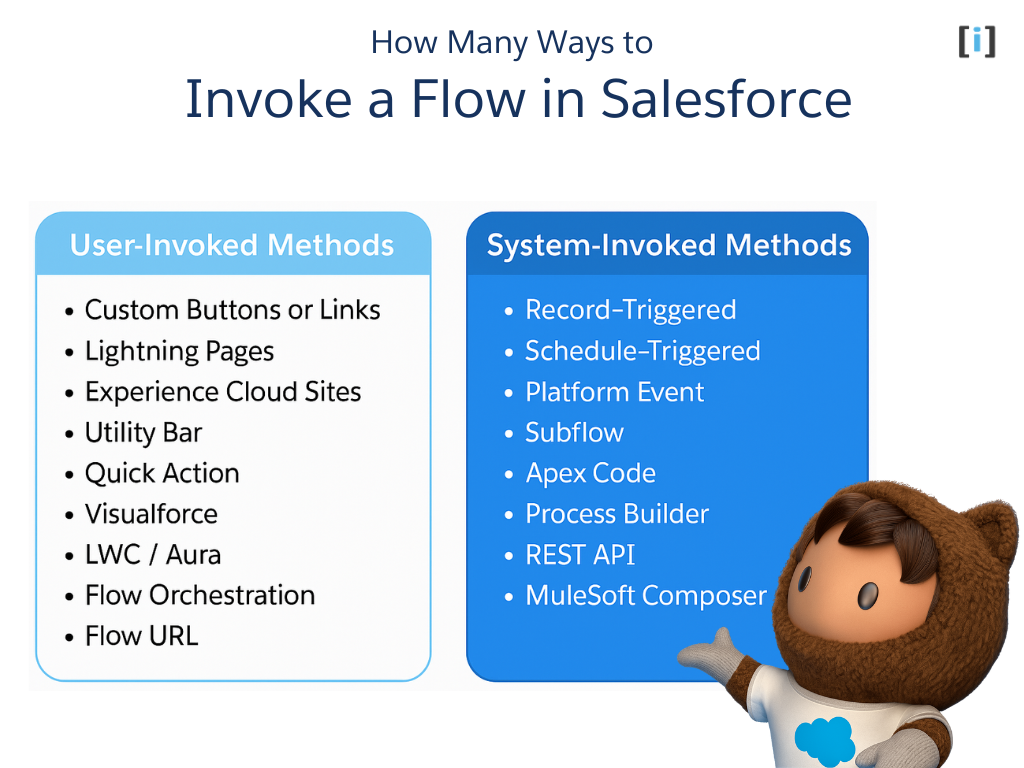
Broadly speaking, there are two main categories:
- User-Invoked Methods (Screen Flows) – These are started manually by users. They’re perfect for guided experiences, data entry, or anytime you want a user to decide when to start a process.
- System-Invoked Methods (Autolaunched Flows) – These run automatically when certain events, conditions, or schedules occur. They’re ideal for behind-the-scenes automation and integrations.
Let’s explore both categories in detail.
User-Invoked Methods (Screen Flows)
These Flows need a user to do something — click a button, tap a link, or open a page — to get started. They’re built to collect or show information and walk users through a process step by step.
1. Custom Buttons or Links
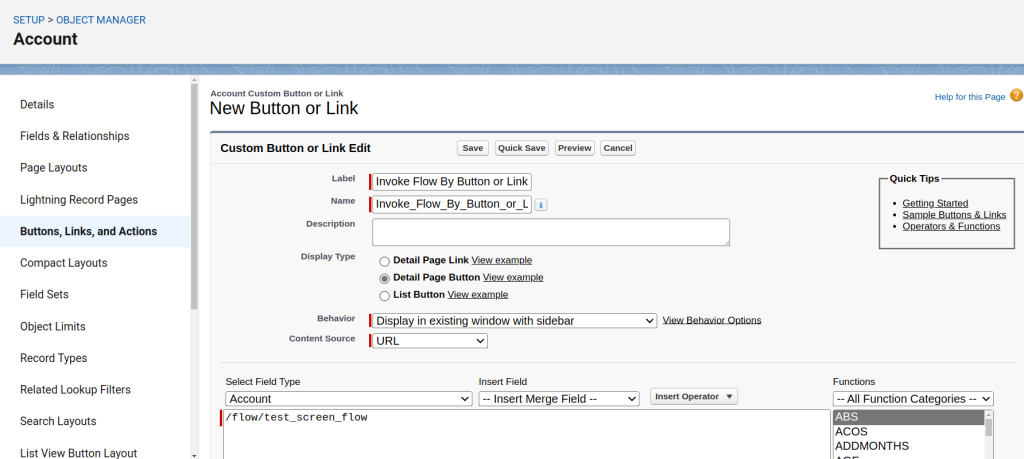
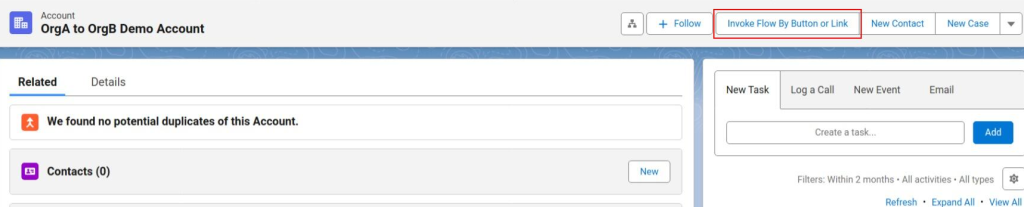
A custom button or link is one of the simplest ways to let users launch a Flow manually. You can add it to a record page, related list, or list view — when clicked, it starts the Flow.
- When to use: Use this when you want users to start a process on their own schedule. For example, “Generate Quote” or “Send Welcome Email.”
- How it works:
- Go to Object Manager and open the object (e.g., Account).
- Create a new button or link.
- Set the URL to your Flow’s unique link.
- Add the button to the page layout.
2. Lightning Pages
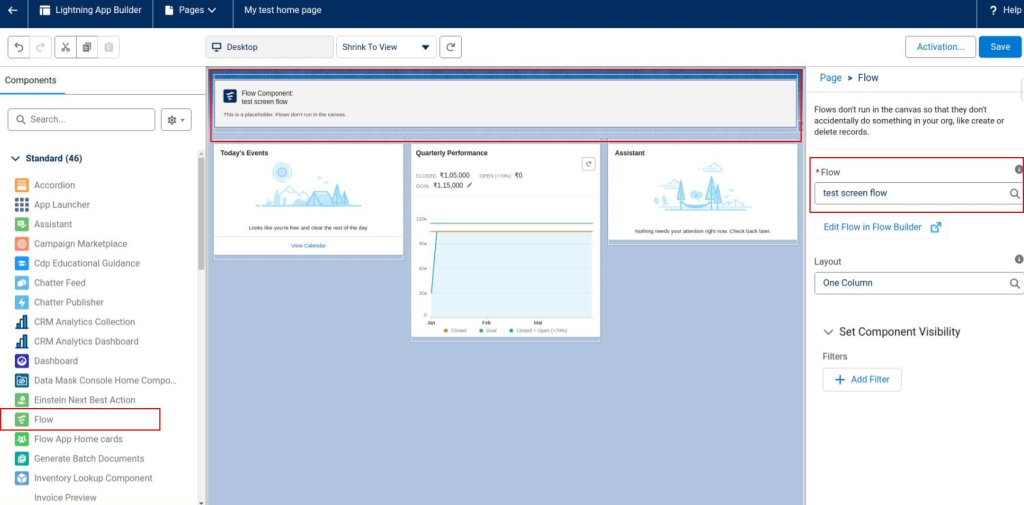
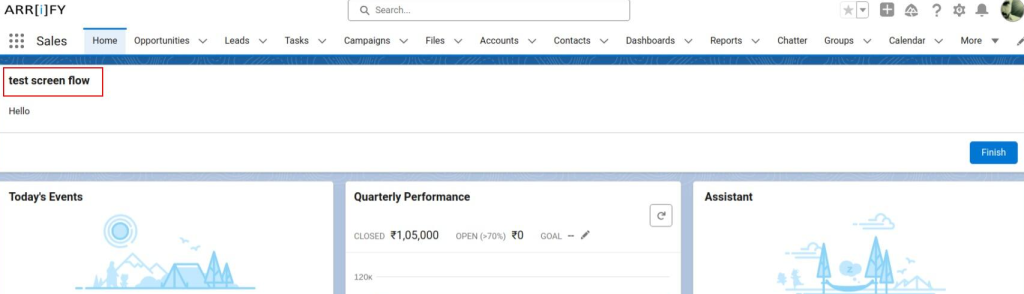
A Lightning Page can display a Flow directly on the screen using the Flow component. This makes the Flow visible to users right where they work such as a record page, home page, or app page.
- When to use: Ideal for embedding Flows right where users already work. For example, placing a “Log a Call” Flow on the Account page so reps can record interactions without leaving the screen.
- How it works:
- Open the page in App Builder.
- Drag the Flow component onto the page.
- Choose which Flow to display
3. Experience Cloud Sites
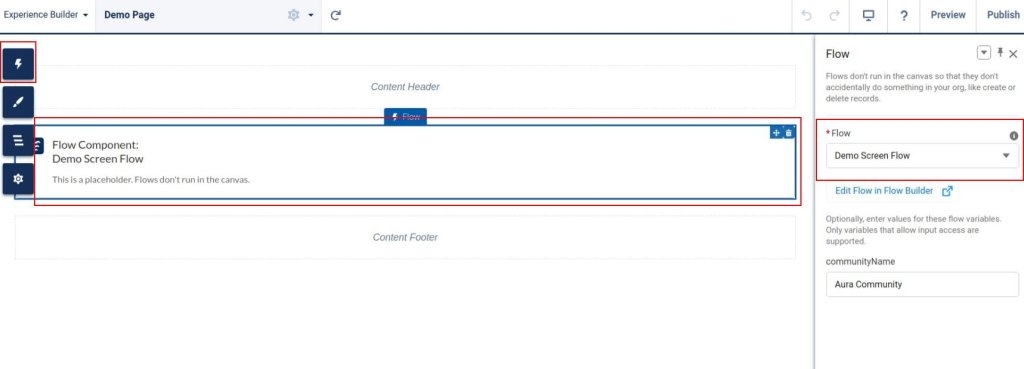
Experience Cloud (formerly Community Cloud) allows you to embed Flows on external-facing portals for customers, vendors, or partners.
- When to use: Whenever you want external users to perform self-service tasks like submitting cases, registering, or updating information.
- How it works:
- Add the Flow component to your Experience Builder page.
- Configure it to run for guest or community users.
- Publish your page.
4. Utility Bar
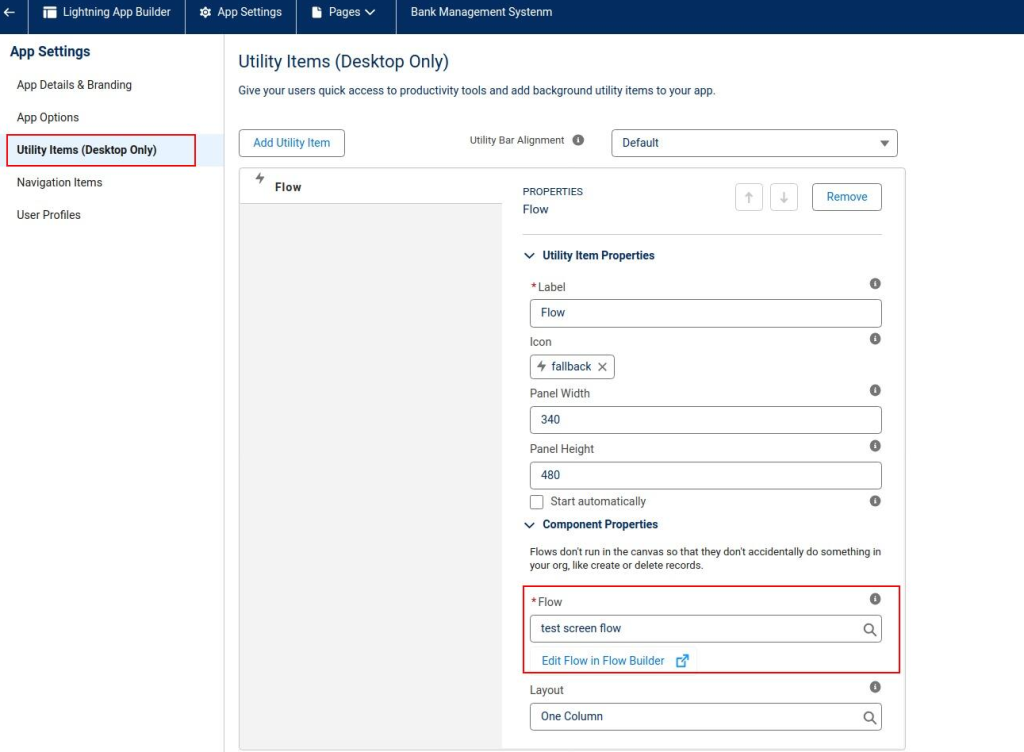
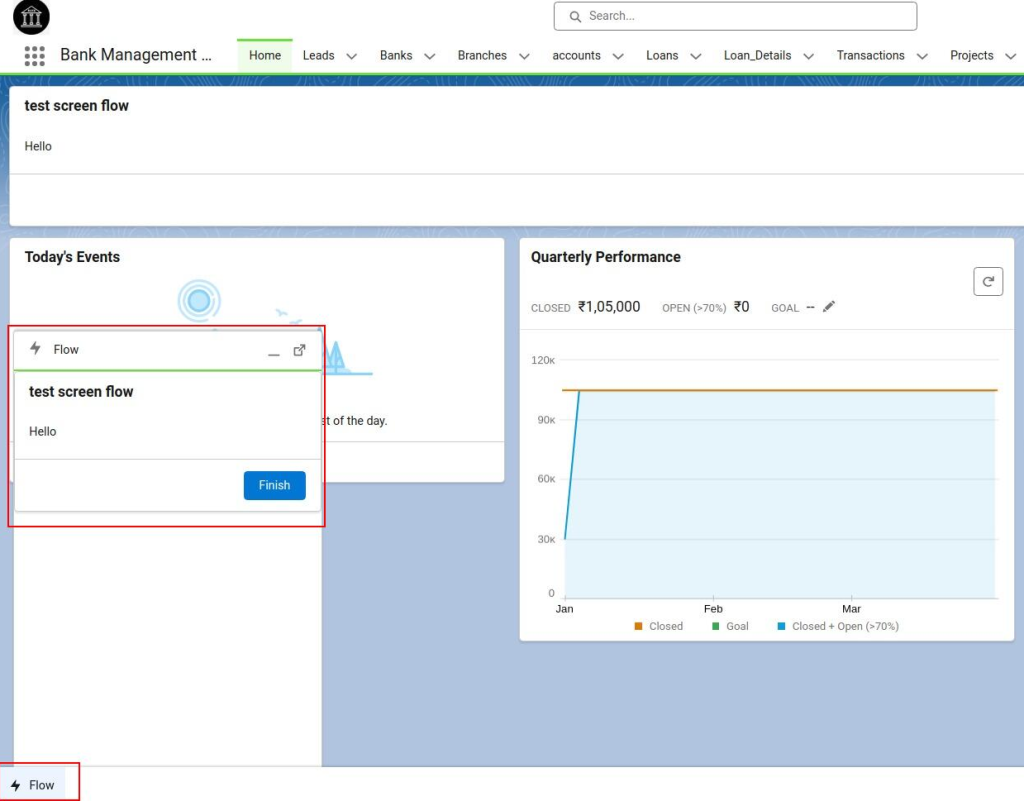
The Utility Bar appears at the bottom of a Lightning app and stays visible as users navigate. You can place a Flow there for quick access anywhere in the app.
- When to use: For short, frequently used Flows that users might need at any time — like logging quick notes, searching records, or submitting feedback.
- How it works:
- Go to App Manager and edit your Lightning App.
- Add a Utility Item for a Flow.
- Choose the Flow and save your changes.
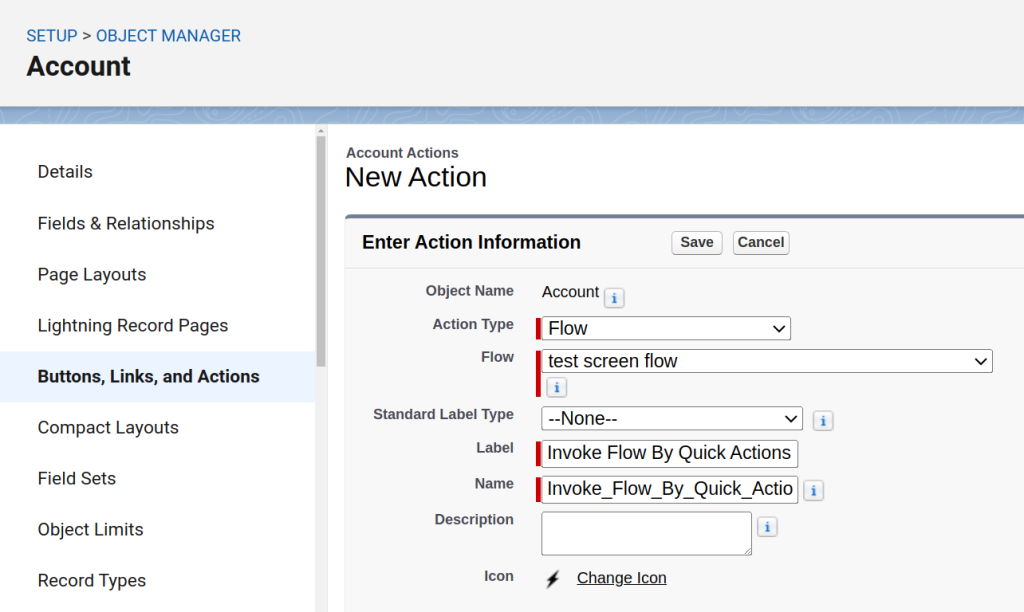
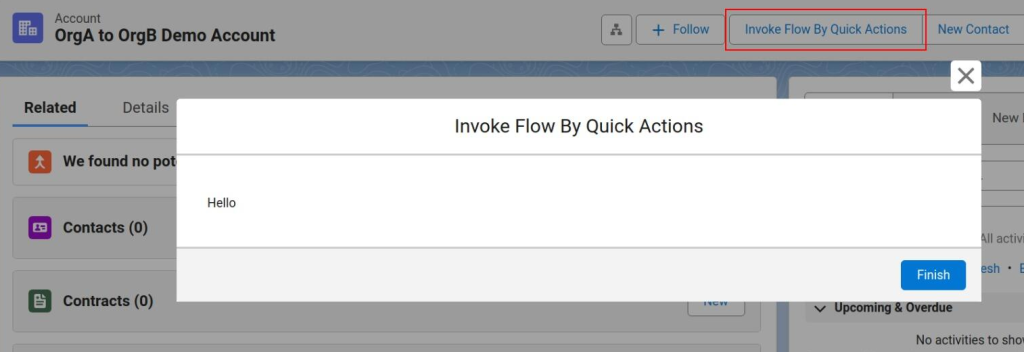
5. Quick Actions
A Quick Action allows users to launch a Flow directly from a record’s highlights panel or the global actions menu.
- When to use: Ideal for record-specific actions that users perform frequently, such as “Close Case” and “Convert Lead.”
- How it works:
- Create a New Action of type Flow.
- Select the Flow and label your action.
- Add the action to your page layout.
6. Visualforce Pages
Flows can be embedded into Visualforce pages using the <flow:interview> component. This is mostly used in Salesforce Classic or in orgs that still have Visualforce-based interfaces.
- When to use: When maintaining legacy environments. When a Flow needs to coexist with existing Visualforce logic.
- How it works:
- Add the Flow component in your Visualforce markup.
- Reference your Flow’s API name.
<apex:page>
    <flow:interview name="YourFlowAPIName" />
</apex:page>
7. Lightning Web Components (LWC) or Aura Components
Developers can embed Flows into custom components for advanced control and flexibility.
- When to use: When you need Flows to interact dynamically with other custom components or to appear conditionally based on logic.
- How it works:
- In your LWC, include the
lightning-flowtag. - Pass variables or inputs programmatically.
- In your LWC, include the
<!-- myComponent.html -->
<template>
  <lightning-flow flow-api-name="YourFlowAPIName" flow-input-variables={inputVariables}> </lightning-flow>
</template>
8. Flow Orchestration
Flow Orchestration lets you connect multiple Flows into one coordinated process that can span multiple users or departments.
- When to use: Use it for complex, multi-step processes, such as Multi-level deal approvals, or multi-stage reviews.
- How it works:
- Create a Flow Orchestration.
- Define stages and steps.
- Assign Screen Flows or Autolaunched Flows to each step.
- Assign users to handle work items.
9. Flow URL
Every Flow has a unique URL that can directly open and start the Flow.
- When to use: Best for quick testing or creating links in Emails, Buttons, and Knowledge articles.
- How it works: Use this URL format
https://[yourInstance].lightning.force.com/lightning/flow/[FlowAPIName]
Limitations:
- Users must be logged in.
- Anyone with the link and access rights can run it.
System-Invoked Methods (Autolaunched Flows)
These Flows run on their own — no clicks, no buttons. They’re built for automating background processes, data updates, and integrations.
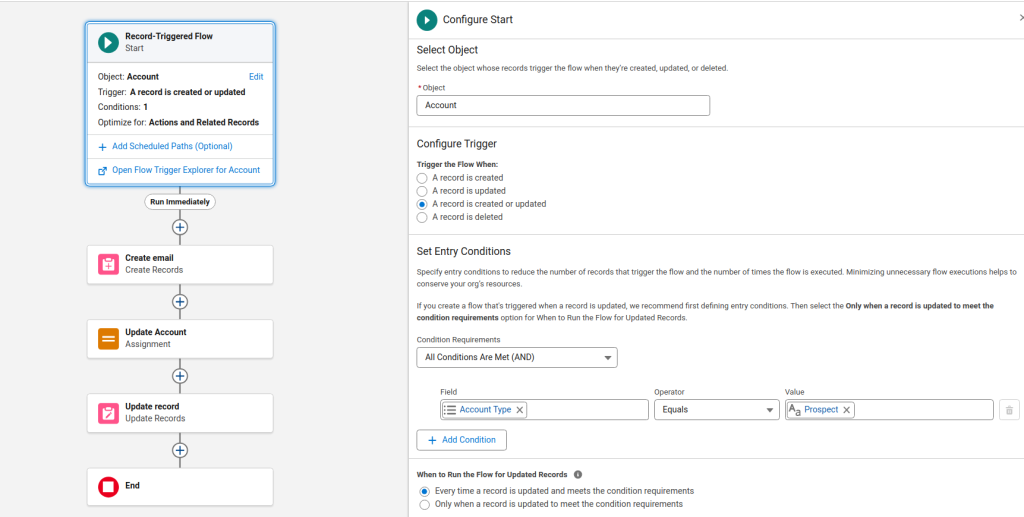
10. Record-Triggered Flows (Before / After Save / Delete)
These Flows run automatically when a record is created, updated, or deleted.
- When to use: This is the most powerful and common Flow type. Use it for things like:
- Updating related records when an Opportunity closes
- Sending alerts when a Case changes status
- How it works:
- Choose your object (e.g., Account, Opportunity).
- Define the trigger condition (create, update, delete).
- Choose whether it runs Before Save or After Save.
- Build your logic and actions.
11. Schedule-Triggered Flows
These Flows run automatically on a specific schedule, like every night or once a week.
- When to use: When you need time-based jobs like sending reminders or running nightly batch updates.
- How it works:
- Set the start time and frequency.
- Define the object and entry conditions.
- Add logic and actions.
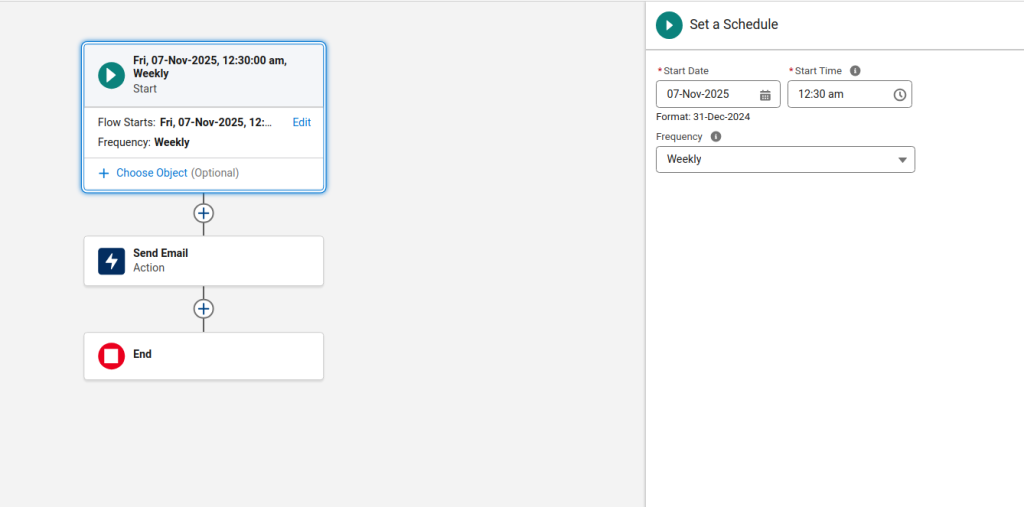
Check out this example – “We’ll show you exactly how a Scheduled Trigger Flow is invoked in Salesforce“.
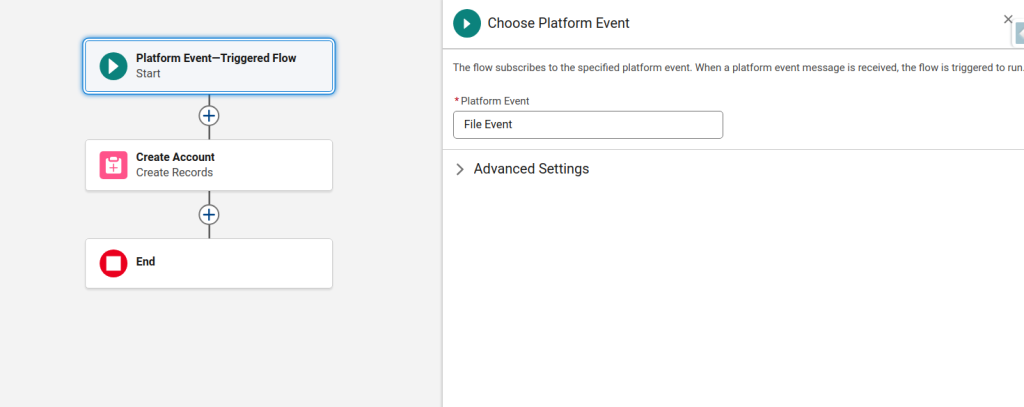
12. Platform Event-Triggered Flows
A Platform Event-Triggered Flow runs automatically when a specific Platform Event is published. Platform Events are basically messages that Salesforce or external systems can send to trigger logic in real time.
- When to use: Perfect for real-time, event-driven processes like:
- Reacting to order status updates
- Processing payment confirmations
- How it works:
- Define a Platform Event in Setup.
- Create a Flow that listens for that event.
- Publish events via Apex, API, or another Flow.
13. Subflows
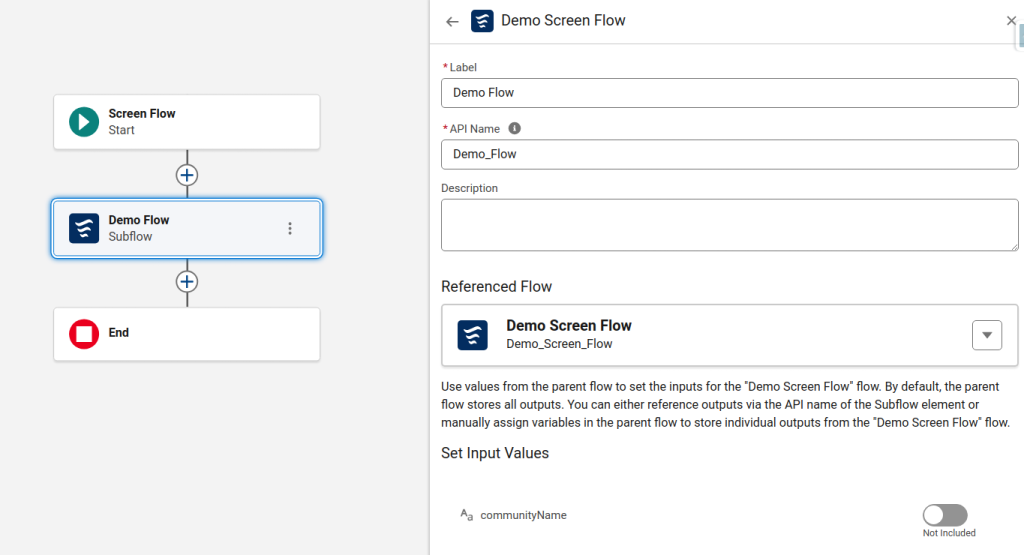
A Subflow lets one Flow call another, making your automations more modular and reusable.
- When to use: When multiple Flows share the same logic — for example, a “Send Email” Subflow used across several automations.
- How it works:
- In your parent Flow, add a Subflow element.
- Select the Flow you want to call.
- Pass input and output variables as needed.
14. Apex Code
Developers can programmatically start Flows using the Flow.Interview class in Apex.
How it works:
When to use: When you need both code and Flow automation working together — for example, invoking a Flow after a complex Apex calculation or inside a Batch Apex job.
Map<String, Object> flowParams = new Map<String, Object>();
flowParams.put('recordId', someRecordId);
Flow.Interview.MyFlowName myFlow = new Flow.Interview.MyFlowName(flowParams);
myFlow.start();
15. Process Builder (Retired)
Process Builder could invoke Flows, but Salesforce officially ended support for it on December 31, 2025. Existing processes still run, but Salesforce no longer provides bug fixes or support for them.
- When to use: Only if you have old automations that haven’t been migrated yet. You should move these to Flow Builder as soon as possible.
- How it works:
- In Process Builder, add an Action to Invoke Flow.
- Select your target Flow.
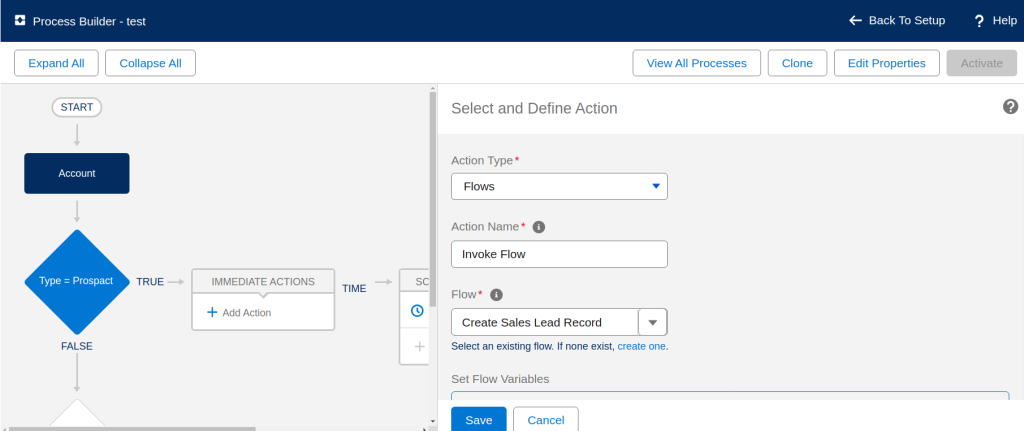
⚠️ Note: Process Builder is past its end-of-support date. Migrate your processes to Flow Builder to stay supported.
16. REST API
External systems can start a Salesforce Flow through the Invocable Action REST API. This lets other platforms trigger Flows in Salesforce remotely and in real time.
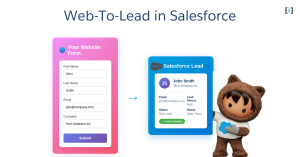
- When to use: When you need to start a Flow from outside Salesforce — for example, a website form that triggers a Flow to create a Lead in Salesforce.
- How it works:
- Create an Autolaunched Flow in Salesforce and mark it as “Available for External Invocation.”
- Use a POST request to the Invocable Action REST endpoint, setting the Flow’s API name in the path.
API Endpoint:
POST /services/data/v62.0/actions/custom/flow/Flow_API_Name
Request Body:
{
  "inputs": [
    {
      "recordId": "001XXXXXXXXXXXXXXX"
    }
  ]
}
Limitations:
- Requires API access and integration knowledge.
- Only Autolaunched Flows can be invoked externally not Screen Flows.
17. MuleSoft Composer
MuleSoft Composer is a no-code integration tool that connects Salesforce with external systems like Slack, Jira, Workday, or NetSuite. It can trigger Flows automatically based on events happening outside Salesforce.
- When to use: When you need to automate cross-platform actions — for example, automatically creating a Salesforce Case when a Jira ticket is opened.
- How it works:
- In MuleSoft Composer, choose Salesforce as one of your connected systems.
- Set a trigger event in another application.
- Configure Composer to invoke a Flow in Salesforce based on that event.
- Limitations:
- Requires a MuleSoft Composer license (not included in standard Salesforce editions).
- Best suited for enterprise-level organizations with complex integrations.
Choosing the Right Flow Trigger: A Complete Comparison
Not all triggers work the same way. Here’s a quick side-by-side comparison so you can see how each method runs, what it’s best for, and what to watch out for.
| Trigger Type | Execution Context | Common Use Cases | Limitations |
|---|---|---|---|
| Custom Button / Link | Manual (User) | On-demand processes like sending emails | Requires user action |
| Lightning Page | Manual | Embedded guided Flows | Takes screen space |
| Experience Cloud | Manual | Customer/partner self-service | External permissions |
| Utility Bar | Manual | Quick utilities | Limited UI space |
| Quick Action | Manual | Record-specific actions | Screen Flows only |
| Visualforce | Manual | Classic compatibility | Legacy / Classic only |
| LWC / Aura | Manual | Custom UI integration | Developer effort |
| Flow Orchestration | Semi-automatic | Multi-step approvals | Requires license |
| Flow URL | Manual | Simple shortcuts | Access control needed |
| Record-Triggered | Automatic | Data-driven automation | Recursion risk |
| Schedule-Triggered | Automatic | Time-based updates | 24-hour min interval |
| Platform Event | Automatic | Real-time integrations | Event setup |
| Subflow | Automatic | Reusable logic | Debugging complexity |
| Apex Code | Automatic | Developer-driven automation | Apex skill required |
| Process Builder | Automatic | Legacy automations | Retired (end of support Dec 2025) |
| REST API | Automatic / External | Trigger Flows from external systems via API | Requires API setup; consumes API call limits |
| MuleSoft Composer | Automatic / External | No-code integration b/w Salesforce and other enterprise apps | Requires MuleSoft license; best for large orgs |
Conclusion
Salesforce Flows can do a lot for you — but only if you trigger them the right way.
- User-Invoked Methods work best for interactive, guided processes where you need someone to provide input or make a decision. They put the control in the user’s hands.
- System-Invoked Methods are your go-to for background automation. They run on their own based on events, schedules, or conditions, so things get done without anyone lifting a finger.
There are so many invocation options because no two business scenarios are the same. Some automations need a user to kick them off, while others should just run quietly in the background.
Once you understand these options, you can match the right trigger to the right process — and that’s what makes your Flows actually useful in the real world.
FAQs
What does “invoking a Flow” mean in Salesforce?
Invoking a Flow simply means starting or launching it. Depending on the setup, a Flow can start automatically or manually.
How many ways can you invoke a Flow in Salesforce?
There are more than 15 different ways to invoke a Flow in Salesforce. These methods fall into two categories:
1. User-Invoked Methods (Screen Flows) – launched manually by users through buttons, pages, or components.
2. System-Invoked Methods (Autolaunched Flows) – triggered automatically by records, schedules, or system events.
What’s the difference between a Screen Flow and an Autolaunched Flow?
1. Screen Flows require user input; they display screens, ask questions, or collect data.
2. Autolaunched Flows run behind the scenes automatically, based on triggers or conditions, without any user interaction.
Can external systems trigger a Salesforce Flow?
Yes! External systems can start Flows through the Salesforce REST API.