Flow Builder
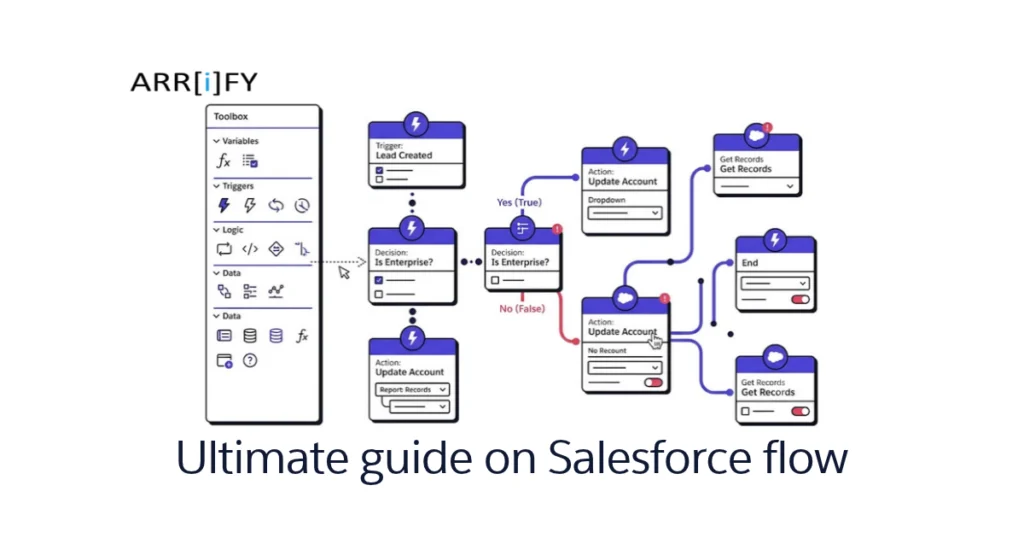
If you’re a Salesforce admin who’s tired of asking developers for help with every automation request, Flow Builder is about to become your best friend. It lets you automate business processes — sending emails, updating records, collecting user input, even calling Apex — using a visual drag-and-drop interface instead of code.
As an admin, you’ll be able to handle the majority of complex business requirements — record updates, approval processes, screen wizards, scheduled jobs — without waiting on a developer. If you’re new to the platform, start with our Salesforce quickstart guide first.
How Do You Call a Flow in Salesforce?
Initiating the Flow Process, also known as calling a Flow, allows you to perform a variety of actions such as modifying Salesforce records, scheduling emails, and executing Apex classes. There are many other tasks that can be accomplished through the use of Flow.
Understanding Types of Salesforce Flows
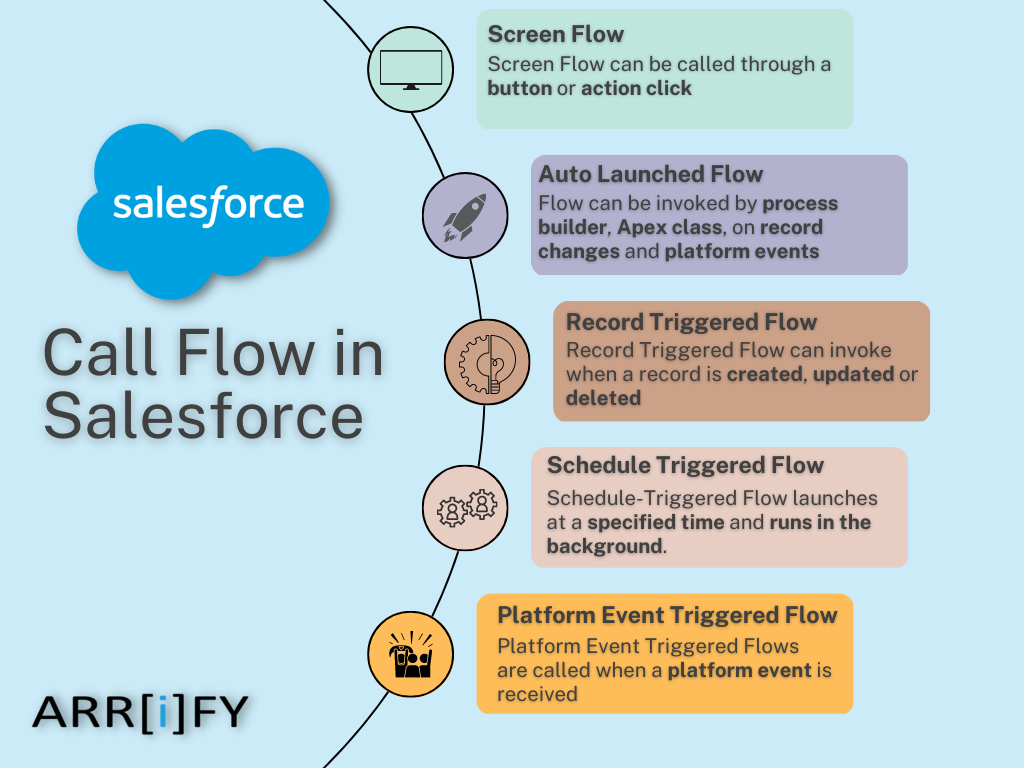
When creating a new Flow, a pop-up window will appear allowing you to select the type of Flow you want to create.
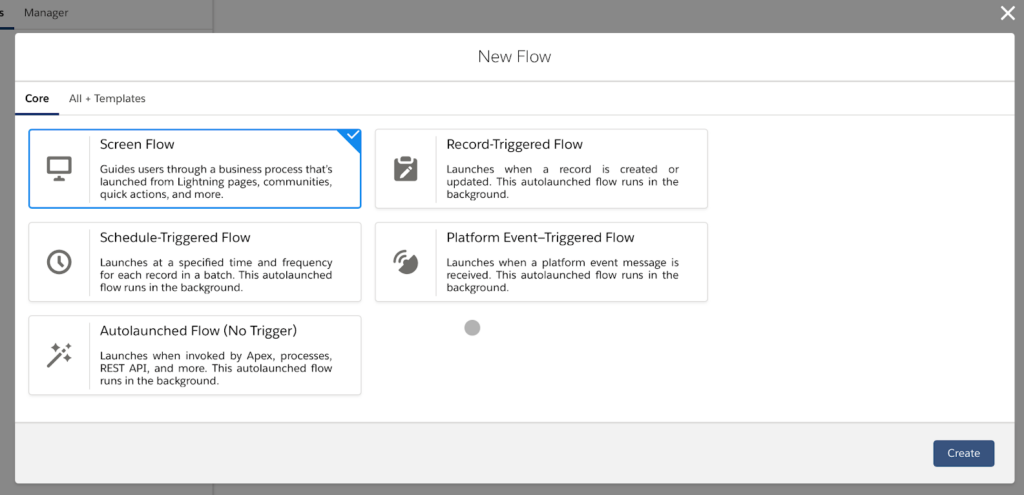
Flow is divided into five parts as Shown above image :
Screen Flow
These types of flows have a user interface element (which can interact with the user) and allow users to put inputs.
Screen Flow can be called through a button or action and displayed in a Lightning Page or the Utility Bar, as a screen to the users that they can interact. This flow can’t be called automatically — it requires user interaction.
Auto-Launched Flow
Auto Launched Flows can be used to perform actions automatically behind the scenes. With this flow, users can run automated tasks that are invoked from the process builder, within an Apex class, in case of record changes and platform events.
Record-triggered Flow
Record-triggered Flows are used to perform actions in the background when a record is created, updated, or deleted.
Schedule-Triggered Flow
Schedule-Triggered Flow launch at a specified time and they run in the background. This is useful for tasks that need to be performed daily on a set of records or take place at a scheduled time.
Platform Event-triggered Flow
Platform Event-Triggered Flows fire when a platform event message is received. They run in the background, similar to an Auto-Launched Flow.
Recommended Next Read : Now that you know how Flow Builder works, explore how to get your flows running in practice: 17 Different Ways to Invoke Salesforce Flows (And When to Use Each) →
Elements of Salesforce Flow Builder
Here, we explain elements of Flow builder that are visible on the screen.
Whenever users open Flow, On the left side of Flow, They will see a set of tools which is depending on the type of Flow that you are working on it.
Manager Tab
In the below image, You can see the Manager tab that contains the existing elements and New resources of the Flow (This is from an Auto-Launched Flow).
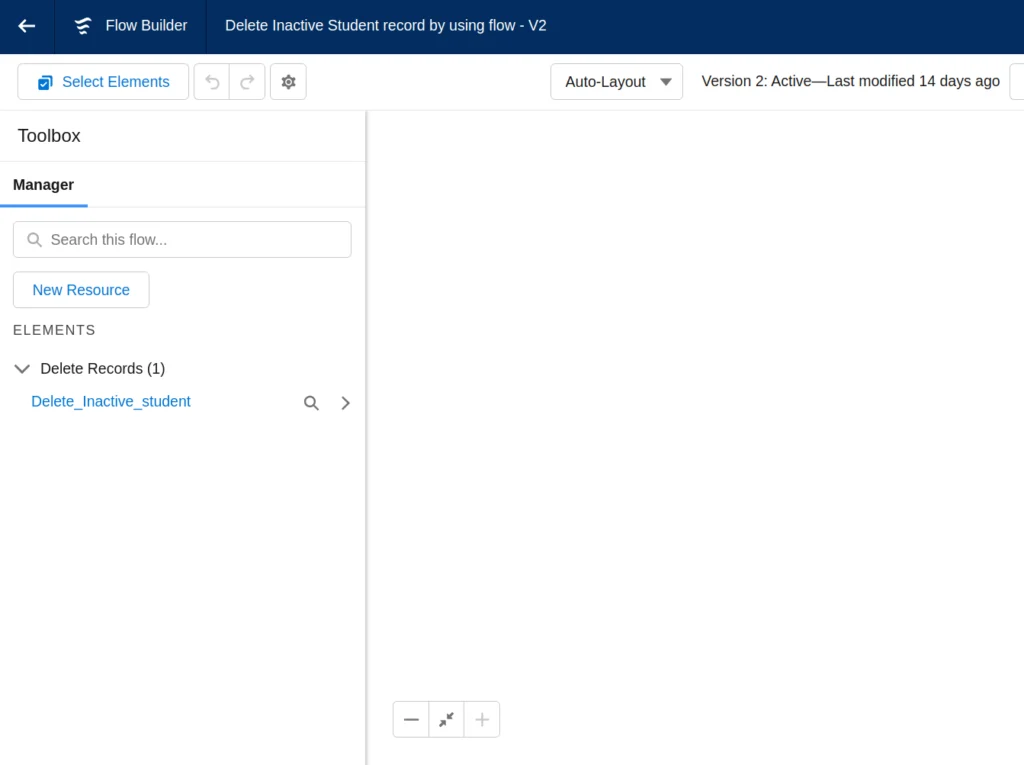
This is where your Resources like Variables, Collections, Constants, formulas, and Choices are stored.
Variables are where you can store data to use in the Flow. This can be text, number, record, dates, currency, boolean, and picklists.
Collections are a group or list of Variables that are stored together. Collections allow you to process multiple records at once in Flows.
Constants are values that you set once and never change. They are useful when you want to refer to a single value multiple times through your Flow. If you ever need to change that value, you just need to change it once and it is reflected throughout the Flow.
The formula displays a dynamic value depending on other values within your Flow. If you need to calculate a future date based on when the Flow was run then a Formula will be helpful.
Choices are used within Screen Elements to display an option to the user.
Elements Tab
Next, you have the Elements tab. In the below image, you can see Interaction, Logic, and Data Elements. These are showing dynamically depending on the type of your Flow.
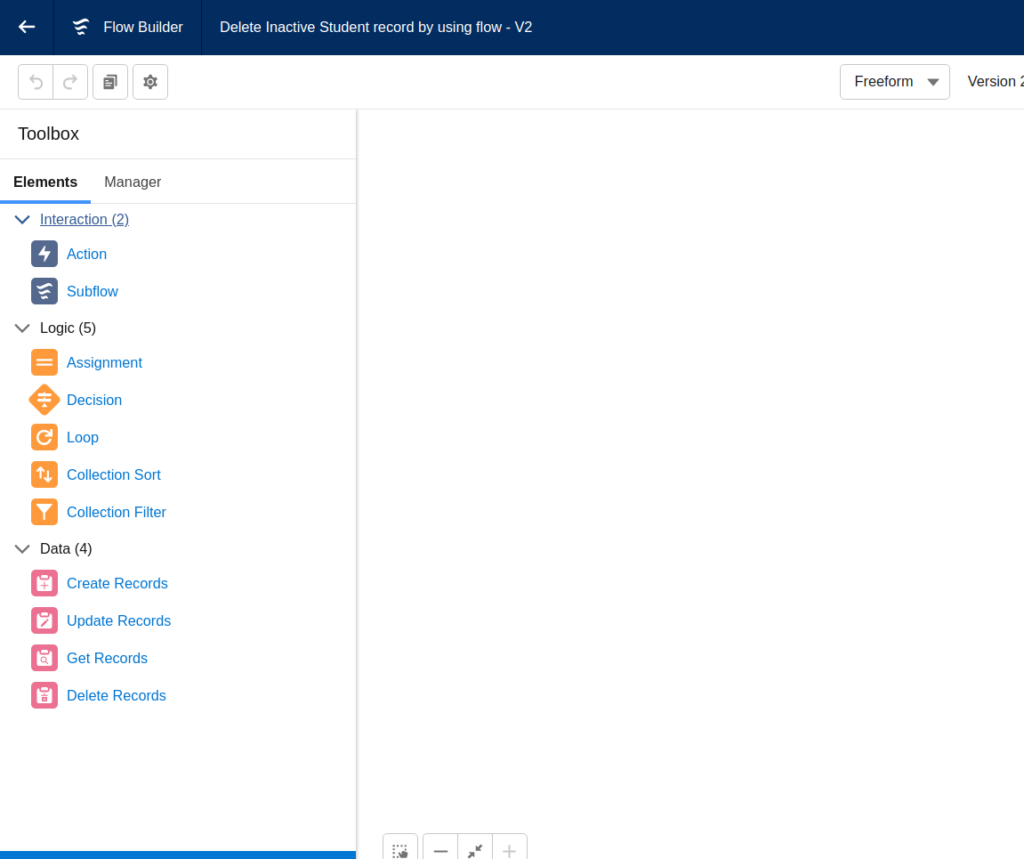
Interaction elements include Screen, Action, and Subflow
A Screen element is only available in a Screen Flow that allows a user to present a screen to another user. This screen can display information and collect information from the user.
An Action element allows you to perform some standard or custom action such as Send Email, a Quick Create, or custom Apex action.
A Subflow element allows the user to call another Flow with the help of your current Flow. This means if you have another complex Flow then you don’t need to repeat the logic in your new Flow.
Logic elements include Decisions, Assignments, and Loops
Decisions allow users to split their Flow into multiple if-else conditions depending on the data.
Assignments allow users to give a value to a variable.
Loops allow users to perform an iteration using collections.
Data elements include Create, Update, Get and Delete record
If you need to perform data manipulation on the Salesforce database — creating an Opportunity, updating a Contact, deleting old records — use one of these Data elements.
Flow Builder Actions
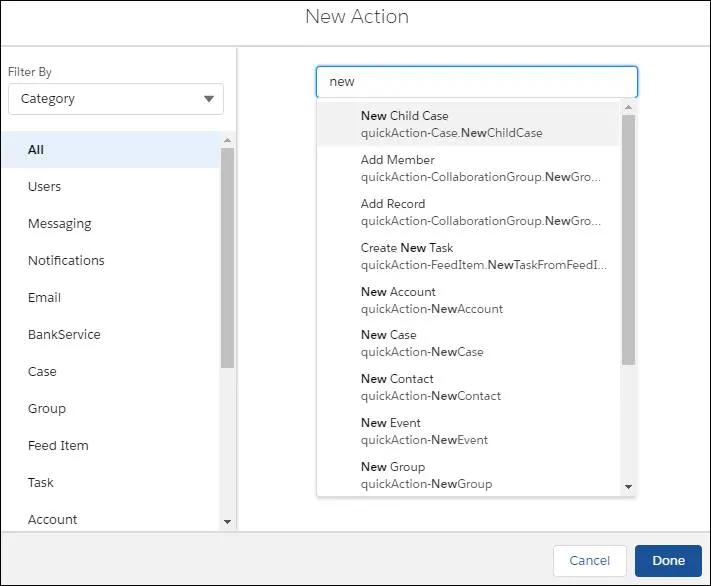
Salesforce provides various types of actions in Flow builder that include :
- Post to Chatter, Log a call, Task, and Event, etc.
- Create, Update and Delete records
- Loop through records
- Submit for approval
- Adding in pause or ‘Wait’ elements
- Generating PDF and send as an email using classic email templates
- Sending email and custom notification (e.g., auto-confirming a Web-to-Lead submission)
- Refresh decision table
- Post to Chatter, Log a call, Task, and Event, etc.
Create Flow in Salesforce
How to Create a Flow in Salesforce?
Total Time: 10 minutes
Go to Setup & Navigate to Flows
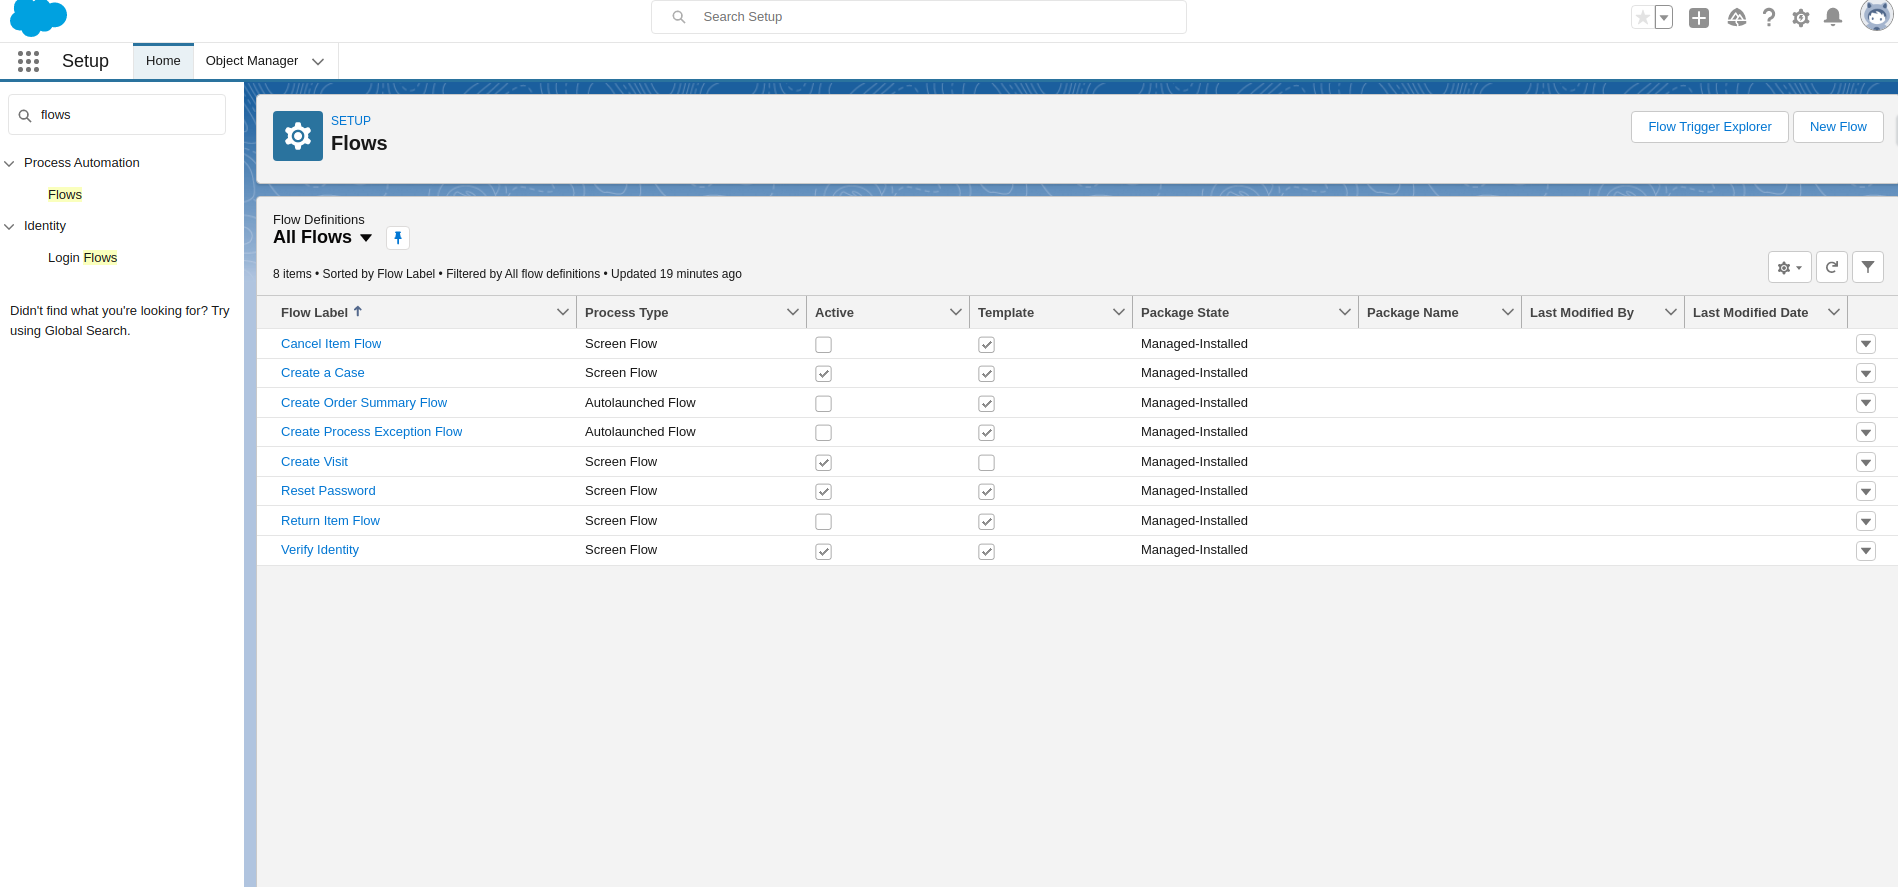
Go to Setup (click the gear icon), then use the Quick Find box to search for “Flows.”
Click on “Flows” from the results.
Click the “New Flow” button in the upper right corner.
Select Flow Type
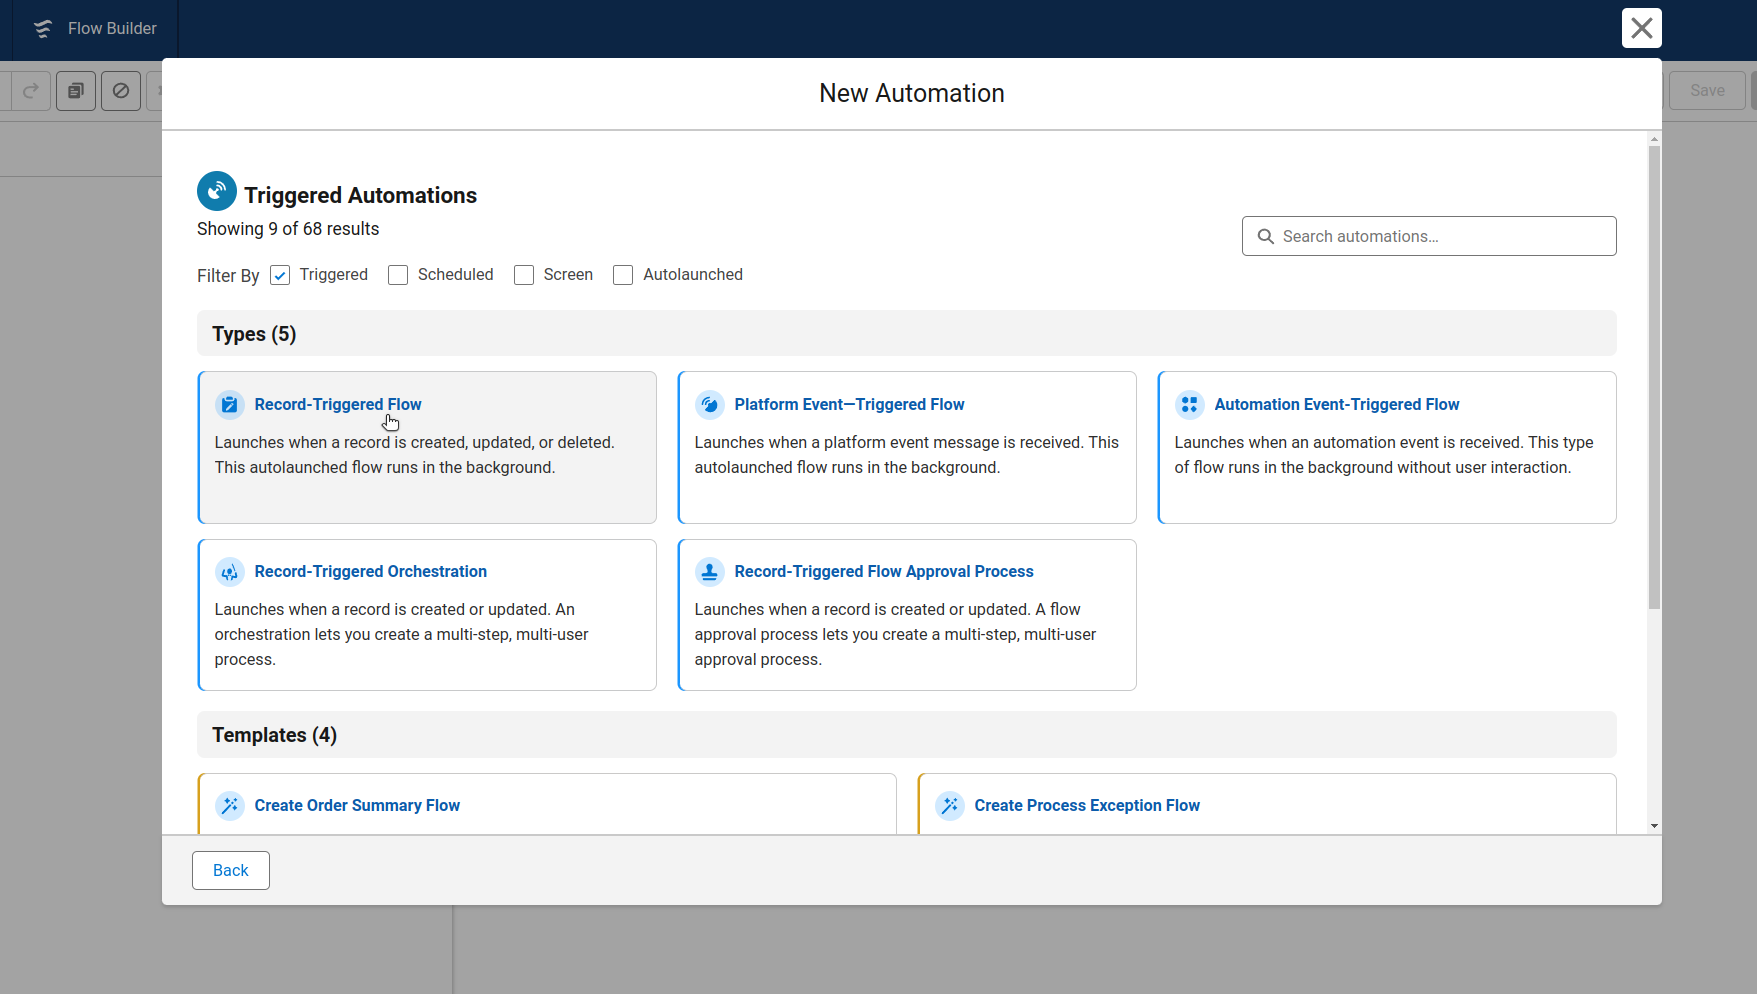
When you create a new Flow in Salesforce, you first see a screen that shows four main automation categories.
Choose a Flow Categories (eg. Triggered Automations).
Select the type that matches your needs (eg. Record-Triggered Flow).
Configure Your Flow Settings
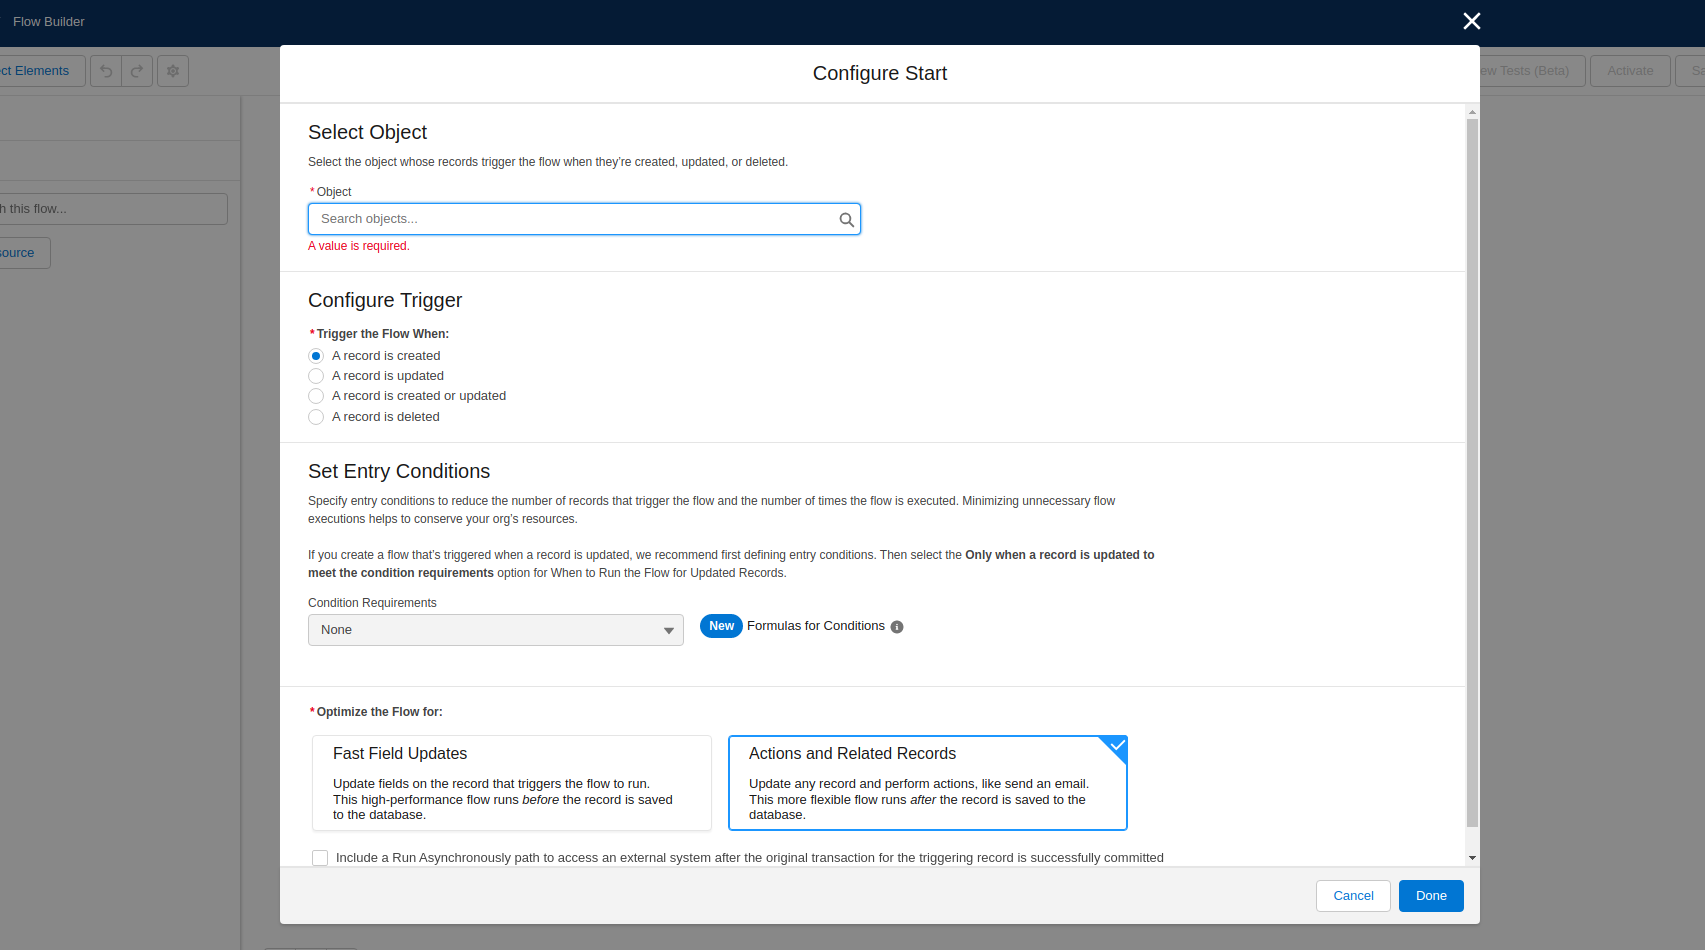
Set Configurations according to your requirements
Add Functionality
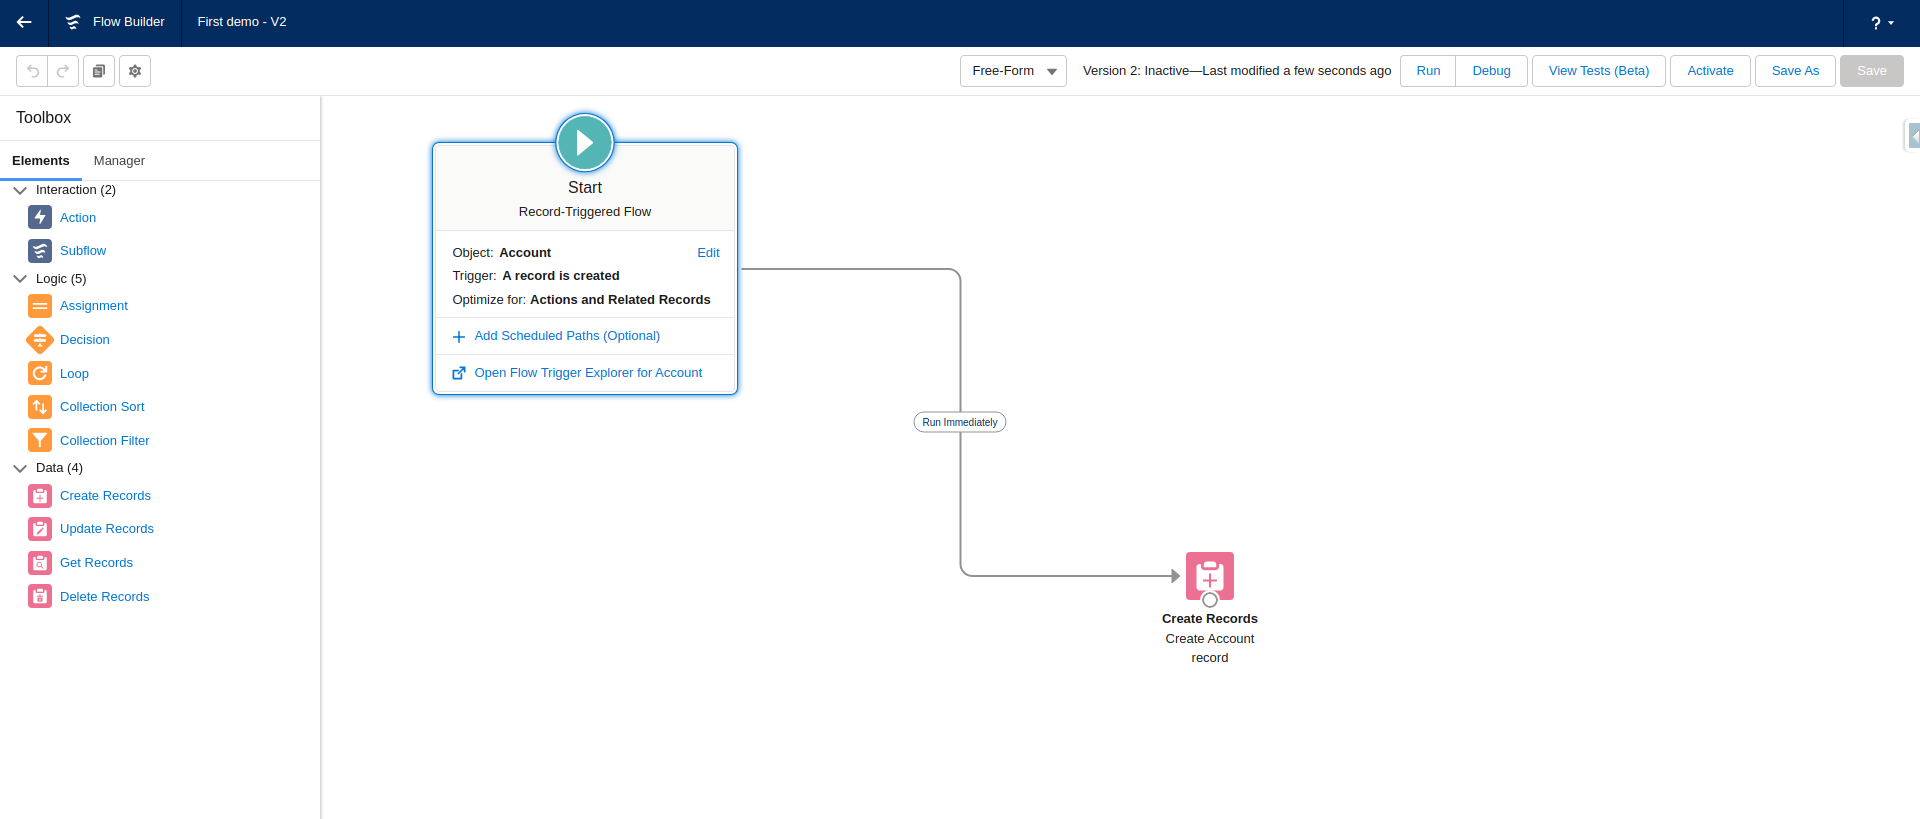
Add Functionality by just drag and dropping elements as your specific need
Save Flow
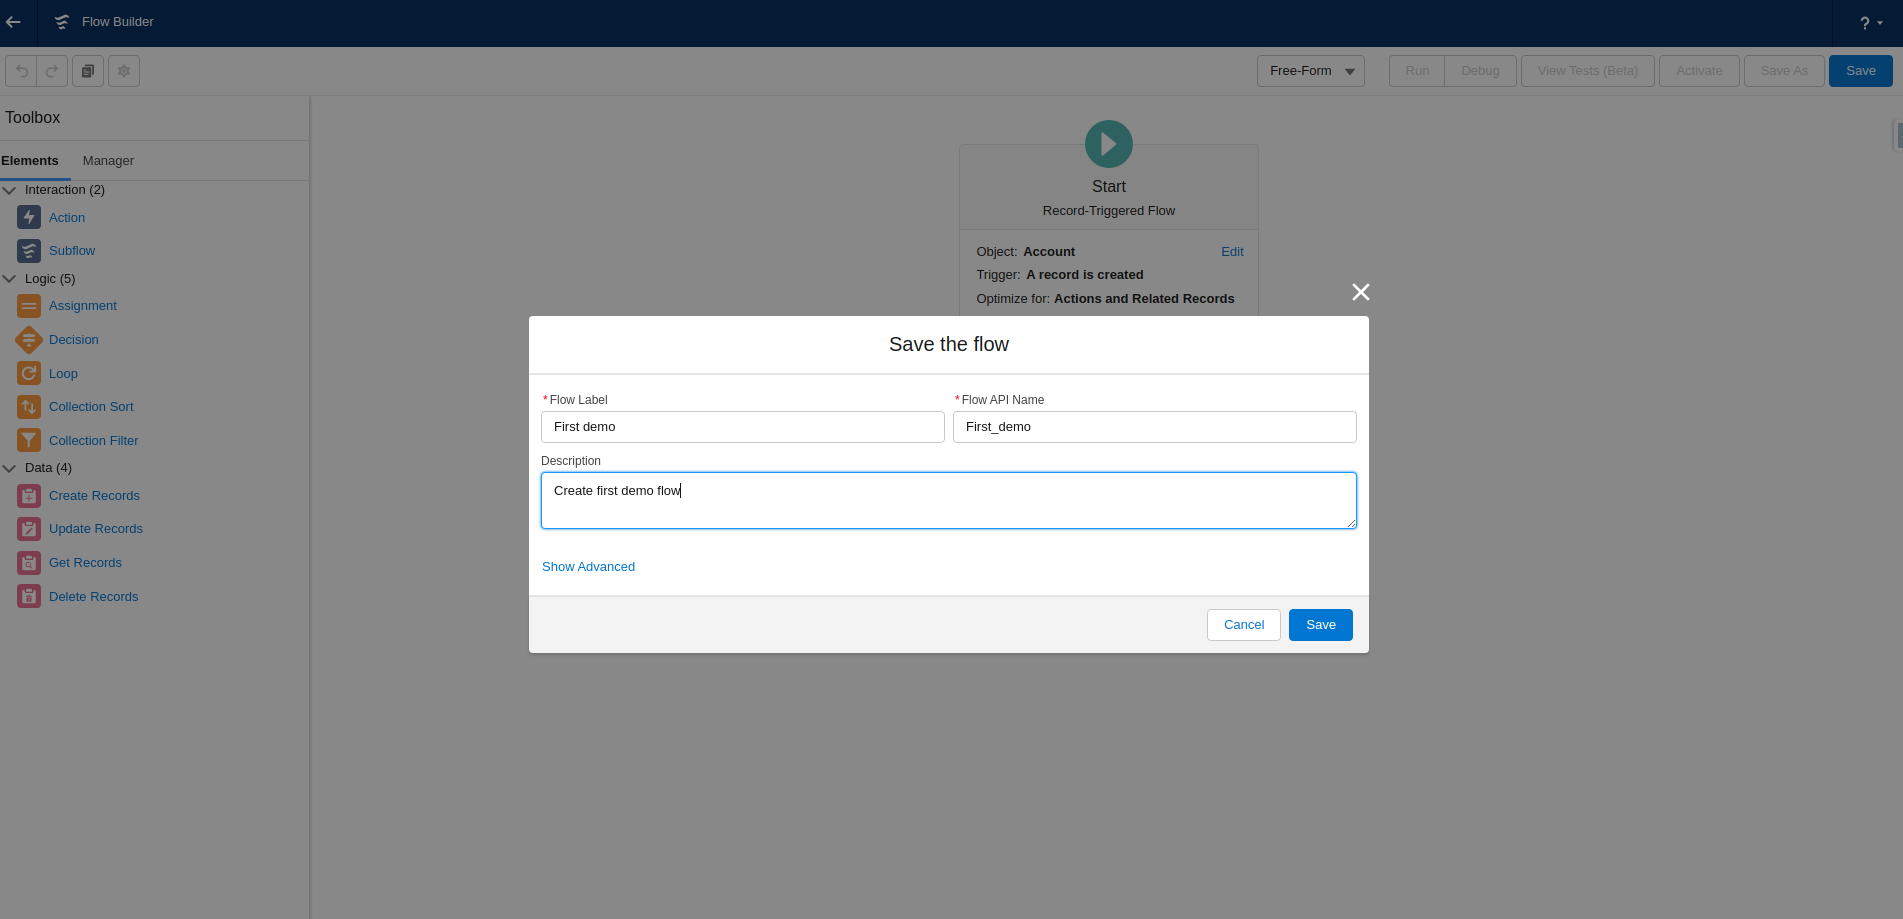
After all customization, Click “Save” and provide:
Flow Label (what users see)
Flow API Name (what developers reference)
Description (helpful for future you and your team)
Activate Flow
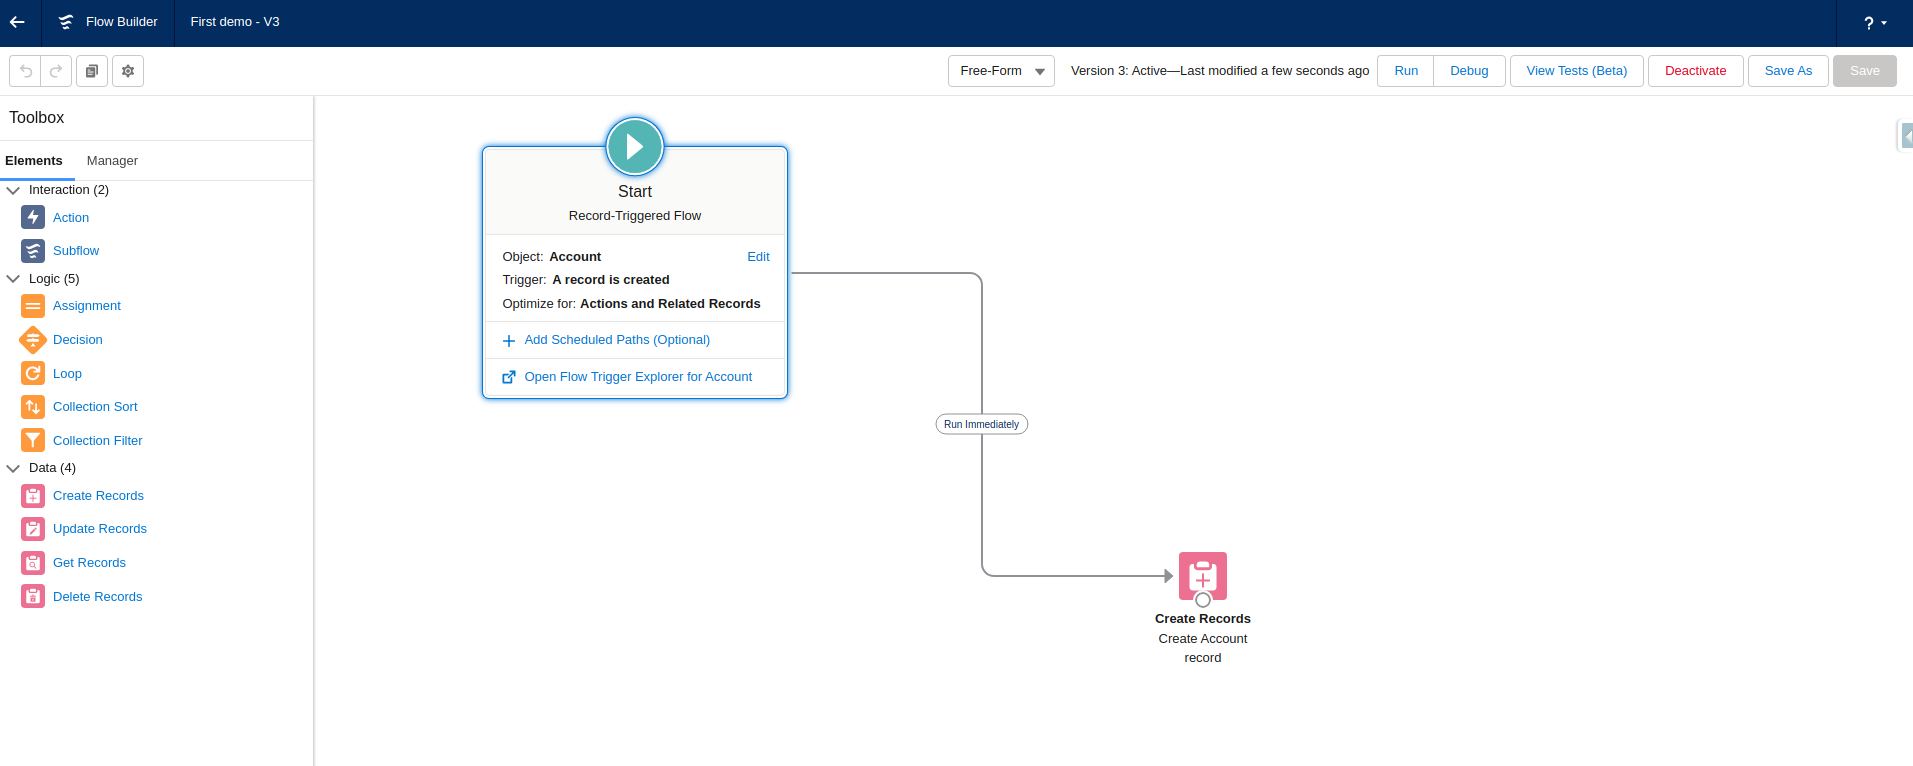
Once you’re confident it works correctly, click “Activate.” Remember, you can only edit inactive versions, so deactivate first if you need to make changes later.
When and Why Should You Use Salesforce Flow?
Salesforce flows can be used when you need to automate complex business processes. If you need to perform mass updates or create complex logic these are some common examples for when you should use Flow.
If you can’t achieve what you need with a simple formula or validation rule, Flow Builder is your go-to. It handles most automation scenarios without code.
Key Benefits of Using Salesforce Flow
- Salesforce Flow is easy to maintain because anyone (assuming they know Flows) should be able to follow along with what you built.
- Flow support screen user interface, Thus Users can be interact with it.
- Flow allow to Query any object and also perform database operations such as Create, Update, Upsert and Delete.
- Flows can be run either before or after a record has been saved to the database but process builder trigger only after a record has been saved.
- Flow can design a logic scenario same as coding by just using drag and drop elements.
The Limitations & Considerations
Limitations
- In case a flow exceeds a governor limit then the complete transaction or changes made by the transaction will be rolled back.
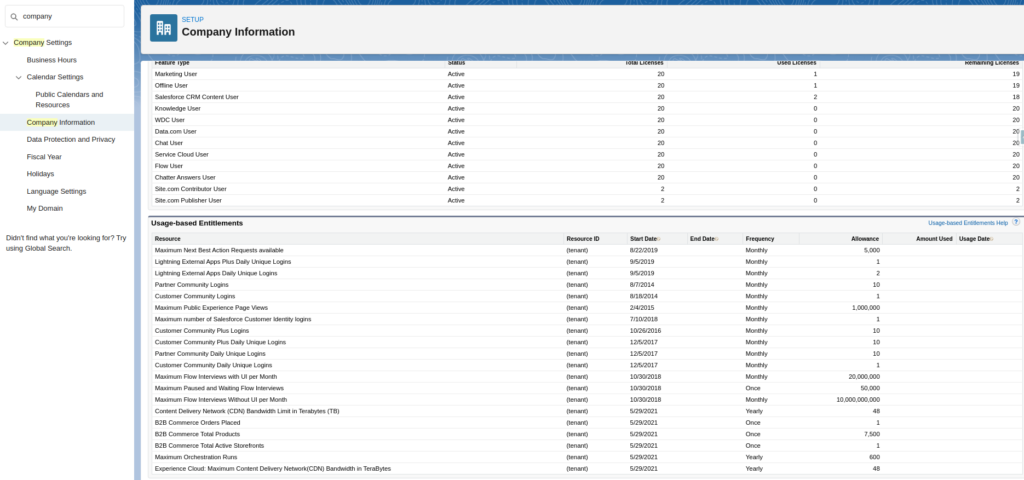
- Flows have usage-based entitlements that determine how many flow are allocated to user per month. User can find it at Setup -> Company Information.
Considerations
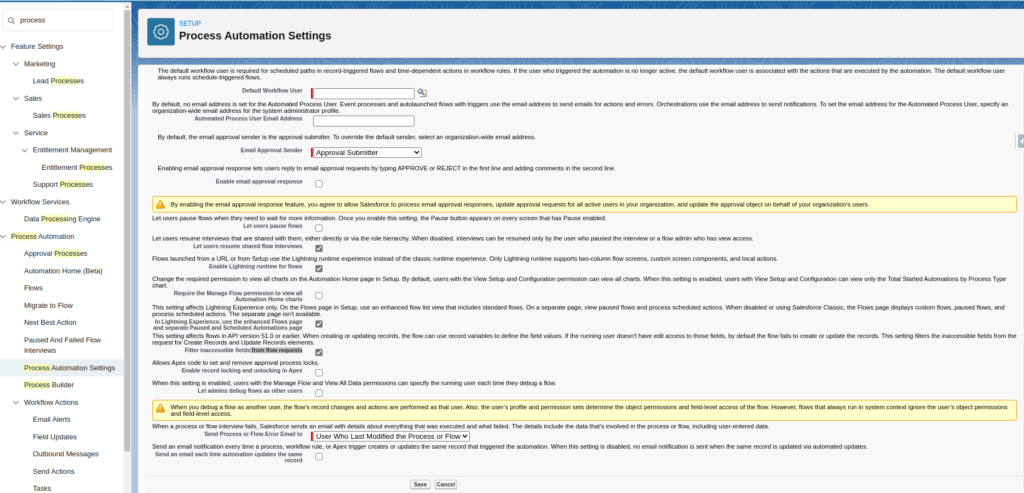
- Flow can access the data only if the running user has permission to access the fields. In case Flow tries to update a field and the field is not editable by the user then flow will fail. This scenario can be avoided by using the setting Filter inaccessible fields from flow requests.
- Above setting can be found in Setup->Process Automation Setting.
- When a user session expires then in-progress flow will be interrupted and cannot resume again. Always test your flows in a Salesforce sandbox before activating in production. If the flow executed actions such as record manipulations then those actions will not rolled back But run any other progress through the flow such as user data entered on the screen, will be lost.
For the full list, see Salesforce’s official Flow Limits and Considerations documentation
When Not to Use Salesforce Flow
There are a few situations where Salesforce flow may not be the best choice for automating business processes:
- Simple field updates: If you only need a simple field default or a basic validation, a formula field or validation rule might be simpler than building a full flow. Use the lightest tool that gets the job done.
- Complex processes with many steps: While Flow is powerful and can handle complex processes, it may not be the most efficient tool for processes with many steps or a large number of decisions. In these cases, it may be better to consider alternative options such as custom code or external integration.
- Limited resources: If you don’t have the time or resources to learn and set up Flow, it may not be the best choice for your organization. Flow can be a powerful tool, but it does require some learning and setup time to fully leverage its capabilities.
- Heavy integration work: If your automation primarily involves calling external APIs, transforming complex data structures, or handling retry logic, Apex or a middleware tool like MuleSoft may be a better fit. Flow can call external services, but complex integration patterns are easier to build and maintain in code.
Overall, The decision to use Flow or an alternative depends on your automation’s complexity and your team’s expertise. If you need help evaluating the right approach, consider working with an experienced Salesforce expert.
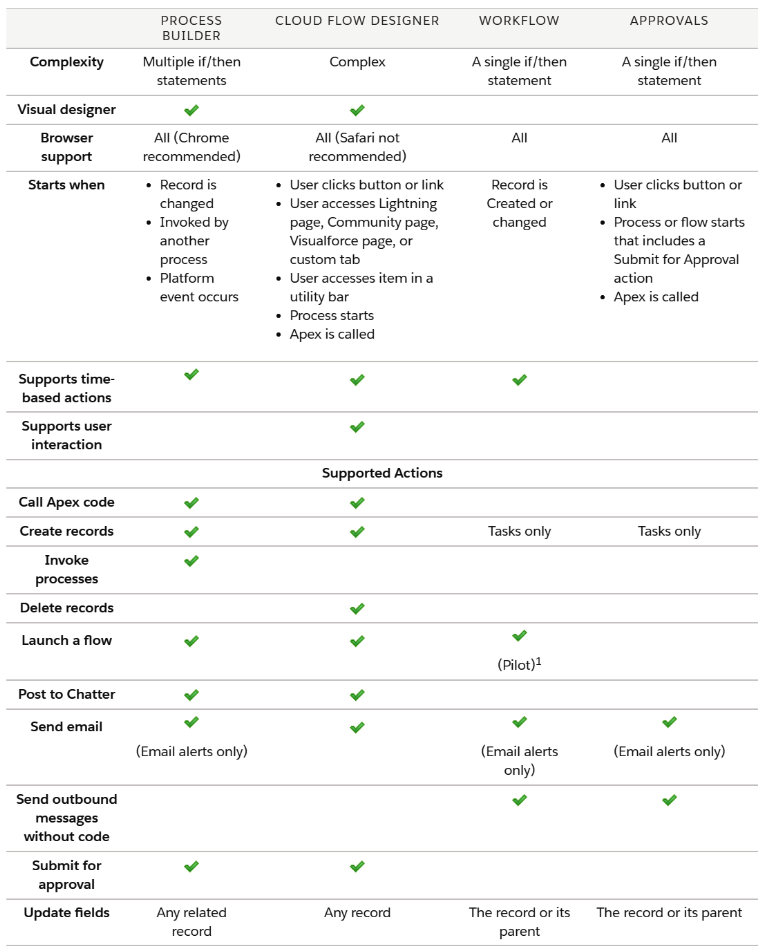
Salesforce Flow vs Process Builder vs Workflow
There are a few key differences between Flow, Process Builder, and Workflow in Salesforce:
- Flow: Flow is a visual tool that allows you to automate business processes by creating and automating processes, known as “flows,” that include decisions, screens, and actions. It is often used for more complex automation scenarios that may involve multiple steps or involve user input.
- Process Builder: Process Builder is a tool that allows you to automate business processes by creating and automating processes, known as “processes,” that are triggered by specific conditions. It is often used for simpler automation scenarios that involve a single action or set of actions based on a specific trigger.
- Workflow: A workflow is a tool that allows you to automate business processes by creating and automating processes, known as “rules,” that are triggered by specific conditions. It is similar to Process Builder, but is generally used for simpler automation scenarios and has fewer features and capabilities.
Note: Salesforce has retired Workflow Rules and Process Builder. Flow is now the only supported declarative automation tool on the platform.
Overall, Flow is typically the most powerful and flexible tool for automating business processes in Salesforce, while Process Builder and Workflow are more suited for simpler scenarios. The choice of which tool to use will depend on the specific needs and complexity of your automation scenario.
Conclusion
Salesforce Flow is the platform’s only supported declarative automation tool — and it’s more capable than Process Builder and Workflow Rules ever were. Whether you’re automating a simple field update or building a multi-screen guided process, Flow Builder has you covered.
Key takeaways:
- Use before-save flows for field updates on the triggering record — they’re faster and use fewer governor limits
- Use after-save flows for cross-object operations, emails, and external callouts
- Always add fault paths to flows that perform DML or call external services
- Bulkify by keeping DML operations outside of loops
- Test in a sandbox before activating anything in production
- Name your elements descriptively — “Check_Amount_Over_10K” beats “Decision1” every time
Whether you’re a solo admin setting up your first automation or a team lead standardizing processes across departments, investing time in Flow Builder pays off quickly.
Need help with complex Salesforce automation? Contact our team for expert support.
Frequently Asked Questions
What is a Salesforce Flow?
A Salesforce Flow is a declarative automation tool that lets you build complex business logic using a visual drag-and-drop interface. You can automate record updates, send emails, collect user input through screens, and call Apex — all without writing code. It’s Salesforce’s primary automation tool, replacing the retired Process Builder and Workflow Rules.
What are the types of flows in Salesforce?
Salesforce offers five flow types:
Screen Flow — displays a user-facing interface for collecting input or guiding users through a process
Auto-Launched Flow — runs in the background without user interaction, triggered by other automations or Apex
Record-Triggered Flow — fires automatically when a record is created, updated, or deleted
Schedule-Triggered Flow — runs at a specified time on a batch of records
Platform Event-Triggered Flow — fires when a platform event message is received
Is Process Builder being retired?
Yes. Salesforce has retired both Process Builder and Workflow Rules. All new automation should be built using Flow. Existing Process Builder and Workflow automations continue to work, but Salesforce recommends migrating them to Flow using the built-in Migrate to Flow tool.
What is the difference between before-save and after-save flows?
Before-save flows run before the record is committed to the database — they’re ideal for setting field defaults, validating data, or calculating values on the triggering record. After-save flows run after the record is committed and are used for cross-object operations like creating related records, sending emails, or calling external services. Before-save flows are faster because they don’t require a separate DML operation.
Can I call Apex from a Flow?
Yes. You can invoke Apex classes from a Flow using the Action element, as long as the Apex method is annotated with @InvocableMethod. This lets you combine declarative automation with custom code — use Flow for the orchestration logic and Apex for anything that requires complex data processing, API callouts, or custom algorithms.